stash reduction

more fiddle faddle by Katherine Hajer

Ouf.

There is a folder on my laptop called "working folder". It's where I throw photos destined for my blogs before I upload them, so I can do the usual cropping, level adjustments, and whatnot.

Usually I am taking photos only two or three blog posts ahead. When I am on a roll, like I was at the beginning of the year, I will take photos, upload them, and then have the blog all ready and scheduled weeks and advance.

And then, you know, things happen, and it all falls apart again.

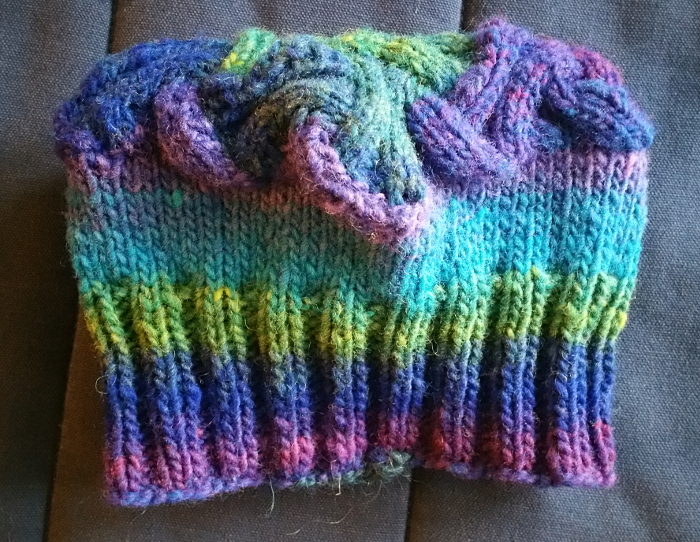
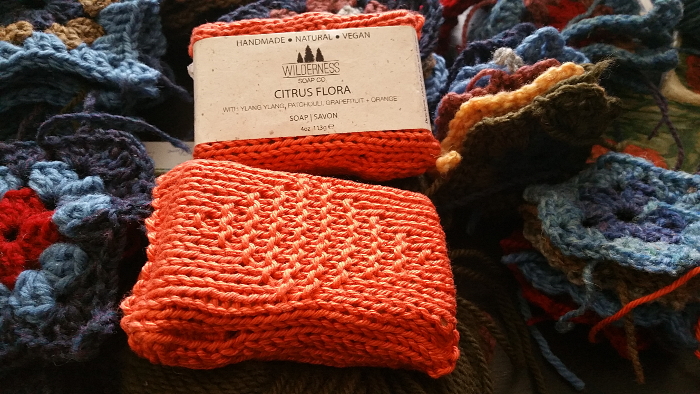
These soap sacks were made for Cheshin for her birthday, which was last spring, which gives you an idea of how far behind I've got. I found some interesting soaps at a local shop and decided to include them as part of her birthday present, but they were minimally packaged with just a cardboard band around the soap. Minimal packaging is all well and good, but it might not survive being mailed to Ottawa and it might not be very protective of the soaps if they aren't used right away.

So I went on Ravelry, where all fun small patterns are catalogued, and found this soap sack pattern. There are lots of different patterns for soap sacks on the net, but I liked this one because it is reusable; most patterns have you sew the soap into the sack and are thus for one-time use.

Besides having the benefit of being free as in beer, the soap sacks feature my favourite "sandwich baggy" closure for pillows and, um, soap — no fussing with knots or drawstrings. The only mod was to change the garter stitch heart motif to a more-practical-for-scrubbing diamond.

I used up an entire ball of mystery yarn from the stash (definitely cotton, but beyond that, no clue). Cotton seemed like a logical choice since it's what gets used most often for handmade washcloths, but Cheshin gave me a bar of soap for my birthday which is entirely enclosed in felted wool, the idea being it will get more felted and therefore more scrubby in the shower. I'm still working through a big bottle of shower gel, but I think the felted soap will be up next.

Because of course showers is where fun experiments happen. Isn't it?

droid cuteness by Katherine Hajer

BB8 front.jpg

The nieces have finally been bitten by the Star Wars bug. The last two times I've visited them, they've been marathoning the films on DVD, and are completely enraptured even though they have seen all of the films many (many, many) times now. Luckily for their auntie, so far Original Trilogy films have been on during visits and not anything from the second trilogy. This is a post about crocheting, so we'll leave it at that.

When The Force Awakens was released, Niece the Elder wanted to know why the movie trailer was playing the Angry Birds theme. How times change.

Of course the nieces now want to go out on Hallowe'en in SW costumes. Niece the Elder wants to dress up as BB8, while Niece the Younger wants to be Rey, even though she is also a massive fan of R2D2.

Niece the Elder didn't like the Jetsonesque fascinator thingie that came with her BB8 costume, so she asked if I could make her a BB8 hat. I'm not too fond of it either, so of course I could.

This is Canada, and the nieces are lucky to live below the snow belt and not have to worry about wearing costumes over snowsuits like their auntie and father did. Still, it can be a bit nippy at night by Hallowe'en, so I made the nieces droid beanies.

The instruction for the BB8 hat and related appliques are in two separate Youtube videos, and only in Youtube videos. This was frustrating. The good news is that if you're completely new to crochet and just really want one of these hats, you can probably make it through by watching these videos, maybe with some beginner crochet videos as warm-ups. The bad news is if you already know how to crochet, it's maddeningly tedious to work through them. I wound up challenging myself to finish a step before the narrative/demo was over, just as a way not to go numb. Near as I can figure, the purpose of sharing the pattern on Youtube rather than on a web page seems to be to make you sit through advertisements. Thankfully these don't played if the video is Chromecast.

r2d2 front.jpg

The R2D2 hat design is by the same person, and is also Youtubed into a hat video and an applique video. Having done the BB8 hat first, I made some execution decisions which were different from what's in the video. Rather than leave floats of unused colour at the back of the work, I cut strands of white yarn and did a sort of intarsia for the one-stitch white bars between the blue areas. I also cut the blue yarn rather than carry it across long stretches of white. I liked the results so much better I unravelled the BB8 hat and re-did it using the same techniques. It made for more ends to darn in, but meh. I'm not one of those crafters who gets upset about darning in ends. The final product was tidier both to work and in finished form.

r2d2 back.jpg

One thing I learned about my crocheting by making these hats: my double crochets tend to be shorter and wider than normal. To get a tidy start of round, I only chained 2 instead of the usual 3, which made for a distinctive gap at the back of the first version of the BB8 hat. The chain 2s are hardly noticeable at all.

Even with re-doing the entirety of the BB8 hat, these were quick to make and took surprisingly little yarn. All the yarn except for BB8's orange came from stash, which was satisfying. It's also nice to make something for Hallowe'en which the nieces can wear throughout the winter.

miscalculated by Katherine Hajer

So there I was, finishing off the last couple dozen of motifs for the ogee blanket, and I decided to join a few motifs just to double-check measurements and confirm they were going to fit together. As one does.

And that's when I noticed that I had made some very wrong assumptions in calculating the number of motifs I'd need.

The first assumption was easy to mitigate. It turned out a vertical row of 11 motifs was closer to the measurement I wanted than the planned 12, especially if you included the border I was going to add. Okay, more arrangement options, less to join, what's not to love?

The second assumption, that's what. I'd figured an original blanket size of 12 motifs long by 12 motifs wide. And I'm not wrong, except that I treated the motifs as a square grid, not as what they are — a tessellation.

Look at that red-edged motif in the photo up top. See how it reaches the halfway point of the row to the left of it? Now imagine there were motifs to the right of it, where the table is. It, and the entire vertical row it belongs to, would span from halfway inside the row to the left to halfway inside the row to the right, adding virtually no width to the overall piece. The point of each ogee adds about a centimetre, not the 13 centimetres I'd planned.

That means I need nearly twice as many vertical rows as I thought to reach the actual width I wanted, which works out to... 12 more horizontal half-motifs and 94 whole motifs.

That's the bad news. The good news is I still have lots of yarn left over, even taking seam yarn and border yarn into account. It's just going to take a few weeks longer is all, and I'll have to be careful when placing motifs which are made from colours in short supply so they don't get clustered together.

Yeah. That's it. Really.

Sigh.

10-90 by Katherine Hajer

There's a saying among software developers: the last 10% of the product takes the last 90% of the effort. I think the same rule applies to making anything, which might explain some of the pitfalls crafters run into when they're working on projects. Consider second sock/sleeve syndrome, or people who get really bogged down and discouraged by the finishing step. It can be frustrating to know there is so much done, and yet so much more to do before completion.

That's where I am with the ogee motif blanket. I've been applying the fourth and final motif round for two weeks now, darning in the ends as I finish each colour set. The final round is just single crochet and takes hardly any time to do. Darning in the ends (8 per motif) isn't so bad either, because there are easy, logical places to bury all the ends, and some of the ends can be darned in two at a time.

But. There are 162 motifs in total: 120 whole motifs, 24 vertical half-motifs, 12 horizontal half-motifs. The half-motifs have the same number of ends as the whole ones, so that's 162x8 ends to do: 1,296.

Sometimes it's better not to figure these things out!

I was sick last weekend, which means all my estimates for finishing are blown out again. I do want to finish soon, though, because spring is already trying to come to Toronto, and I don't want to be working on a bedspread-sized blanket when the weather is warm.

The assembly stage is coming soon soon soon, and it will have its own challenges. The bigger the piece gets, the less portable it will be. Probably I'll get around this by assembling in strips three motifs across, then connect the strips to form the full blanket.

The border will have to be applied in rounds. I don't think there's any better way to do that.

Onwards.

math at the helm by Katherine Hajer

Years ago at a craft fair, I learned a great technique from Eugene of The Philosopher's Wool Company. I'd bought a kit from him which called for “random stripes”, and I was worried my stripes would either be not random enough, or so random as to be sloppy and erratic.

He told me to keep a six-sided die in my knitting bag, and to roll it to determine how many rows to do for a single stripe. Ta da! No-stress randomness with an aesthetically-pleasing frequency.

The conversion of aesthetic work to simple mechanical action is great for all sorts of stash-busting projects. You get the satisfaction of a good-looking finished object without having to check every stitch for how it's affecting the overall look.

Recently I heaped all my Briggs & Little yarn on my living room floor, took out the skeins that didn't go with the majority, and figured out which colours I needed to buy to complete a usable combination for a blanket (4 skeins).

Then I categorised my 18 colours into 13 groups, and let the math kick in.

The first step was to complete a single motif so I could figure out how many motifs I needed to make a blanket. Is it just me, or are most blanket patterns too small to actually use as blankets for anyone who's not baby-sized? Maybe it's because I'm stash-busting, but I like blankets to be at least as long as I am (175cm) and at least as wide as my sofa is deep, since that's where I usually use them. This particular blanket I planned to be about the same dimensions as my bed (202x152cm).

The motif I was using (the ogee granny from Mystical Lanterns) is both oblong and tessellated. I had to work out the number of half-motifs I'd need at the edges to have a straight border.

Conveniently, the overall area was 12x12 motifs, 144 total. I had 13 colour groups, and 11x13 would get me to 143 motifs. One block extra and I was there.

I love it when little coincidences like that happen. They usually mean you're on the right track.

The first two rounds of the motifs and half-motifs were pretty mechanical — just make versions of all possible colour combinations. Not having to think through each set made the work go quickly. After a week I had 13 stacks of half-done motifs sitting on my coffee table, grouped by the colour of the second round.

And then next... as of this writing I've finished the third round for all of the motifs, and have started adding in the fourth round and darning in the ends. More progress photos next week.

random hats by Katherine Hajer

Hats can be great for needlework experiments. You only cast on about half a sweater's worth of stitches, play around with stitches and colours, bring the top to some sort of logical conclusion, and there it is — a hat. They're also great for stash-busting, because you only need to make one of them, and so long as they are in reasonably wearable colours, no-one is too concerned if they don't matchy-match one's coat and gloves perfectly.

Okay, that's true for Canada. Perhaps in more temperate climates people are pickier. Here the prevailing attitude is, "It's warm, it's clean, it fits, it doesn't look too awful and I gotta go out. Done." It's not unusual to see someone otherwise dressed in rather nice business attire sporting a toque in the colours and logo of their kid's hockey team.

The hat at the top of this post is the infamous Shedir pattern Knitty published a few years ago, and which is now part of their free download supporting breast cancer awareness. Shedir was designed as a chemo cap, but it's also a very stretchy design, so it will fit on the head of someone with hair.

I've made Shedir before; an effort that was originally made for me but wound up going to my friend Cathy. My face is too square/round to wear toque-style hats successfully, whereas hers is thinner and looks great in them.

It was fun working through the pattern again. Shedir is an absolute joy to knit, especially if you enjoy Bavarian/"baby" cables. The instructions are flawless and the finishing at the top transforms the mini braided cables of the sides into a nice flat star shape.

I used a stashed ball of Cascade 220 100% superwash wool, but if you are making it as a chemo cap, use the recommended Rowan Calmer. It's smooth, very soft, and super stretchy. It will feel good on a bare scalp not used to being bare, and if they like, the recipient can keep using it as a hat after their hair grows back.

The brown hat with the star colourwork is the Basic Hat pattern from Ravelry, plus a colour chart from the Norwegian Star earflap hat. Both are free patterns, and both happen to have the same stitch multiple, so they go well together (the Basic Hat author recommended the earflap chart). The version I made uses up some more yarn from the nieces' kitties playset. A lot of things are coming back to the kitties playset right now.

The last hat to show, but actually the first I made of these three, is the Windschief-ish hat I made from the same brown yarn as the Basic Hat. This is a beanie with a twisted-rib border, where a quarter of the stitches stay in twisted rib while the rest of the hat switches to stockinette. The ribbed section biases to one side by decreasing before and increasing after the section, until it's time to decrease for the crown. At that point, you decrease before and after the ribbed section, plus at two other equidistant points. Because there are only four decrease points instead of the traditional eight or twelve, you have to decrease every round instead of the usual every other. That means that the "camera iris" effect at the top of the hat shifts twice as fast, and the ever-narrowing ribbed portion swirls around the crown in a pleasing spiral effect.

At least, that's how this hat went. The pattern is for sale, for $6 USD. That's nearly $8 Canadian at the time of this writing, and for a hat I can guess so much about just by looking at photos... I just can't. There's instructions for a cowl included, but the cowl just seems to be the same as the hat, except you never do the crown shaping, and you put a twisted-rib border at the top as well as the bottom. The cowl "fits closely", which tells me it's the same circumference as the hat. I'm actually planning on making another hat and a cowl to match it, just because the pattern seems show off to take variegated yarns well, and I have several hundred grams of variegated to get out of stash.

In the meantime, I found... most of another skein of brown buried in a basket of red and blue yarns I had set aside for the giant stripey blanket. It's actually visible just left of centre in the first photo of that link. I'll have to figure out what to do with it, but I suspect it will be turned into another hat.


poké-woolies by Katherine Hajer

Niece the Elder's birthday is on New Year's Eve, which gives you an idea of how far behind on blogging I am right now.

Ahem. Let's start again.

Niece the Elder's birthday is on New Year's Eve. Besides dooming her to a life of birthdays where there's always a party, it means that she tends to get gifts a little late from me. It's hard to come up with distinctive Yule and birthday gifts when the birthday happens only a week later.

Niece the Younger, meanwhile, is not quite old enough to see her sister get a gift without her getting the same. Her birthday is at the end of March, so I told them I would get them both little gifts for each one's birthday, so they both got things both times.

Right now they are both into all things Pokémon, especially the trading cards. My mum found them some commercially-made Poké knits, and suggested I make them hats and matching mittens.

There are a lot of patterns on-line for Pokémon, of varying degrees of aesthetic success. My hat and mitts are based on this free pattern, though I followed the advice of other people and crocheted the circle motif instead of duplicate stitching it. The other mod I made was to only cast on 80 sts for the hat, instead of the recommended 100 — a lot of posters commented 100 sts was too big for their kids. I got 80 sts by remembering that Elizabeth Zimmermann calculated a hat to be the right size if it were half the circumference of a sweater, and looking up how many stitches at the same gauge I would need to knit the nieces sweaters.

The mittens are the same basic two-needle pattern from a free Paton's leaflet I've been making since I was twelve years old. It's so basic, in fact, that it's very easy to adapt to specific colour patterns, as done here.

Here's Niece the Younger modelling a hat while her big sister attends hockey practice:

I gave them a booster pack of trading cards to go with the knits, plus some lenticular bookmarks with wildlife scenes on them. I think the cards and especially the bookmarks were a bigger hit, but they liked the knits. Niece the Younger pointed out it meant she would always have three Pokéballs on her in case she found some monsters to catch.

The best part (for me) is that the black, silver, and white yarn were already in stash because of the kitties I made them, so I only had to buy the red. So I managed to work some stash-busting in too.

DIY spontaneity by Katherine Hajer

cloche finished.jpg

One of the myriad benefits of being proficient in some sort of DIY is that you always have gifts on hand — they just probably require some assembly.

I recalled that when Tara and I went to some local street festivals over the summer she was looking for a cloche hat. There were plenty of options around — it's a shape that's back in style again — but for something so recognisable, there are infinite variations. 

There are plain cloches, and then there are ones with fantastic spiral sculptures wandering all over the standard cloche shape. There are cloches adorned with ribbons, feathers, silk flowers, sequins. 

I found a free pattern on reliable Knitty, and dug through my stash for suitable yarn that would match Tara's winter coat. My stash being what it is, it did not take much digging. 

(I only blocked the brim because the crown's shaping was good as-is.)

The pattern is one of those ones which seems daunting at the outset (240 sts for a worsted-weight hat, whaaaaat?), but which resolves to a reasonable and easy bit of work in short order. Half of those 240 sts make up the spiral, and they get decreased away to nothing in very few rows. The remaining stitches get decreased by 20% and then form the crown.

I gave the hat the hair-conditioner treatment prior to blocking, since the hat sits low enough to touch the skin at the forehead and back of the neck. This had the added benefit of making the fabric quite a bit more limp than it was during knitting, and flattened out the curl at the cast-on edge. 

I'd like to make this again in different colours. It's super-retro but classic at the same time, with the benefit of being practical for Canadian winters. 


better knitting through chemistry by Katherine Hajer

Several years ago, a group of my knitting friends and I decided we were all going to try out dyeing wool with Kool Aid. None of us had ever tried it before, and it sounded like an easy, fun thing to do. It was my turn to host a knit night, so on the appointed evening I set several large pans of water ready on my stove, and people showed up with Kool Aid, yarn, and snacks.

It was a lot of fun, and a bit scary. By the time the process is completed, the water used to dye the yarn is completely clear again. The yarn gets rinsed after dyeing just to make sure everything is colourfast and... yeah, everything was. The yarn got washed twice afterwards (more on that below), and no dye came out of it at all.

Just regular Kool Aid, water, and some vinegar if I remember right. It really makes me regret all those "juice crystal" drinks and popsicles I had as a kid.

I dyed 100g of Briggs & Little Regal with a large packet of orange Kool Aid, because nothing says "chemistry experiment" than taking a hank of natural yarn spun at a mill that's been around for 150 years, and turning it a soft orange with drink crystals.

The yarn sat in stash for a long time. I was so eager to see what the dyeing would do to the wool that I didn't think about what I was going to knit with it. I finally decided to make Cathy a hat and a pair of mittens for Yule.

The hat and mittens pattern both come from The Shape of Knitting, the Tilda hat and the Mer mittens respectively. The hat reminded me of a whale's tail for some reason, and the Mer mittens' cuffs have a ripple based on those of sea anemones.

They're both great designs for the knitting and for wearability. The hat is like a slouch hat, but without the excess fabric those usually have. Instead, it curves over the crown of the head while leaving the underside with just enough fabric to meet up gracefully. The joining-up of the front and back involves some fun 3D shaping which is not too hard to work so long as you put faith in the instructions.

The Mer mittens are mostly double knitted. Why do more knitting patterns not take advantage of this technique? It makes things so much more comfortable and easy to knit. The mittens were also the first time I used the technique the book's author calls a speed increase, and it's a great one to add to the general repetoire. A knitter can use the increase to easily double the number of stitches for an entire row or part of a row, quickly and with no stitch distortion. I like how the cuff ruffle gives them a little bit of flare without being ridiculous or overly girly. I also like how the ruffle is only on the back of the mitten, so it won't get in the way.

I love Regal yarn for its minimal processing, but sometimes people find it scratchy (feh!). Therefore, I found this project a good excuse to try some more home chemistry. After washing the finished items in Soak, I worked a generous amount of hair conditioner into them and let them sit for several minutes. Then I rinsed out the hair conditioner and let things air dry on a rack per usual.

Wool haters will still find them scratchy, but they really are much softer than they were before. It was definitely worth using the hair conditioner! I did notice the ribbing of the hat had a more "limp" hand than it did before, but since the rib is for fabric design (it keeps the short rows and the finishing neat) and not stretchiness, that works. The mittens are more flexible now, which is a bonus.

kitties! by Katherine Hajer

As with any human endeavour, there's a certain amount of misconceptions and just plain head-messing with needlework. Non-DIYers will often assume you are a) poor and b) trying to save money, whereas in truth making things by hand is often at least as expensive as buying ready-made (though of course with the bonuses that you have far more control over factors like colours, sizes, and fibre content).

Crafters play head games with themselves too. I have a bad habit of under-estimating projects which require making lots of small things. Sure, each small thing may be very quick to work up, but the finishing can equal or surpass the work necessary for a much larger thing.

The nieces requested me to knit them kitties back in mid-October. Niece the Younger wanted blue, Niece the Elder grey with a black face. The kitties also had to stand up on their own and have toy mice to play with. Got that? The kitties needed toys.

The kitties. Uh huh.

Fortunately, I like to keep track of what knitting books have been published for just such occasions, and knew that Osborne and Muir of Princess Diana sheep jumper fame had written a book called Knit Your Own Cat (among many other books). Both the blue cat and the Siamese (they didn't have the right shades of grey and black at the yarn shop, so I made do) are knitted from the British Shorthair pattern, which was the most, er, "catlike" of all the cat patterns. The rest of the patterns tended to give the cats very narrow bodies and pointed faces, which made them look rather rodent-like.

I did originally intend to also make the nieces Bengal cats in their preferred colours, but once I'd stuffed the first one I realised I didn't like the body proportions. Do you see what I mean? The hind legs are too thick, the forelegs too thin, the neck is too long, and although I did mod the head a little so it would be looking straight ahead instead of down like the original, it's just not right. To me it looks more like a bird's head. It's lovely shaping and all, but it's just not a cat.

Someday I will borrow the book from the library again and plot out the fur pattern on a graph, so that I can expand it and make it to cover the shape of the British Shorthair. I just ran out of time.

In the meantime, I knit the kitties some mice from this great (and free!) 20 Minute Mouse pattern, and crocheted each of the kitties a bed, a dangle toy, some collars, and a food bowl. I also got some Goldfish crackers for the food bowl because, let's face it, those things look like pet kibble to begin with.

The collars were made last, and were finished around midnight Christmas Eve. Like everything else for this project, they weren't difficult, but they were fussy. Foundation single crochet for the collar strap. A single star or moon (circle) medallion. Then sewing the strap together and sewing the medallion to the strap, burying four separate ends into a finished piece made up of not-very-many stitches. It was all very fiddly, as was everything else in the play set. Altogether there are two finished cats, two beds, two food bowls, two dangle toys, four toy mice, and eight collars. It all took much longer than expected.

Niece the Elder has already named her Siamese Fluffball. Niece the Younger's kitty went through several names Christmas afternoon, ranging from Fluff to Fartball. We'll have to see what she settles on.

spirals, stretch, physics by Katherine Hajer

Niece the Elder requested a thin, warm hat to wear under her hockey helmet, so I headed to the internet and found this free Swirl Hat pattern by Mandie Harrington.

This is one of those great free patterns one finds sometimes. The directions are written for a wide range of sizes, from preemie to adult. The writing-up is very clear, and includes colour coding so you can easily keep track of the numbers for the size you are making. I'm not surprised at all that as of this blog post the pattern is available in eight different languages. In itself it's a great example of the internet glomming onto a truly cool thing someone's done and running with it.

The spiral rib design means that the fabric will stretch comfortably to fit lots of different heads. When I was making it I kept calling it the "Jiffy Pop" hat — the swirl is similar to the aluminum foil top of the Jiffy Pop pan before the popcorn puffs it out. I like that it was written for fingering weight yarn instead of the usual worsted or chunky — not everyone wants or needs a thick hat for all winter occasions! The nieces do play a lot outside during the winter, but they also spend a lot of time sitting in cars in full winter gear. It makes sense for them to have thinner hats for when they might be cold but not necessarily braving the elements.

This hat is a great example of a project that is fun to knit up, but also very quick. The regular rib at the lower border bothered me more than usual. Nothing to do with the pattern — I just wasn't into it. The first few rounds of the spiral rib were confusing, but once I learned how to read the fabric it was very easy to do. The rhythm's a little different from the sorts of texture and lace I'm used to. One thing to watch out for: the spiral lace means that the start of round is not obvious after the work gains some height. As always, I'm reluctant to use stitch markers, so I noted where the yarn tail from the cast-on was, and traced that rib up to where I was working to determine where I was in the actual round. I was using dpns instead of a circular needle anyhow, so I had a backup indicator.

The top of the hat is completed via a stitch pattern modification which decreases the stitches over several rounds, bringing the hat's swirl to a graceful close with a flat, non-lumpy finish.

The bubblegum pink sock yarn was originally bought as embroidery yarn for the Hello Kitty-style boot cuffs I made Niece the Elder back in 2012. That only took a miniscule amount, so most of the skein has been sitting in my stash ever since, making me wonder what on earth I was going to make with bubblegum pink sock yarn. Turns out the remainder of the 100g ball will make at least two, possibly three hats. The nieces are prone to lose hats, so I'm going to keep making bubblegum pink ones until I run out of yarn.

cowl crazy by Katherine Hajer

I got an interesting knitting book from Book City a while ago called The Shape of Knitting. At the time I thought, okay, this could be good for stash-busting, and then I put it on my shelf and sort of forgot about it.

Something clicked a couple of weeks ago, and it came down from the shelf. This time I pulled several different balls of orphaned chunky-weight skeins of yarn from my stash and tried out this cowl pattern.

Here's the cowl laid flat and without its buttons sewn on yet, making a lovely scimitar shape:

If you know anything about knit or crochet, but don't know the pattern or book themselves, you might still make an educated guess as to its construction. Start one of the buttonhole tabs, join new yarn for a few rows to make the vertical buttonhole, then merge the halves. Make a second buttonhole tab the same way, then knit across the two. Make the cable twist, which is several rows high and overlays the other half of the cowl, so... oops, must need to start and stop the yarn a few times in there too, right?

Nope. The entire thing, dear reader, is made in one continuous piece. There is one tail from the initial cast-on, and one from the final cast-off, and that is it. Sew on the buttons (which go in nice logical places, so are not hard to locate), and you are done.

Plus 85% of it is done on 9mm needles. Each one takes maybe three and a half hours to make, especially once you get comfortable with the tabs/cable part. Is it any surprise I made four of the things?

The two shown above went to my chiropractor and her office manager as Yule gifts. The one below (and another one I didn't photograph) got donated to charity. Mostly I had to make myself stop because the button costs were starting to add up.

But if you can lay your hands on the book and have about 120m of chunky-weight yarn handy, I strongly recommend this pattern. It's quick, it's unorthodox, it's fashionable, and it's fun.

the stash-busting power of entrelac by Katherine Hajer

Entrelac has long had a reputation as a stash-buster. Gather up some yarn in complementary colours and the same weight, have at it, and come out the other side with a Harlequin-style sweater. Nothing easier, right?

I've been trying to make myself something in entrelac since high school and never come up with anything. Never.

What's up with that? For one, I'm usually trying to work without a pattern, and never seem to make a gauge swatch big enough to calculate sweater circumference correctly. Entrelac tilts the stitches on their sides, which means entrelac doesn't fit into one's preconceived notions of rows and stitches.

For another, I think I've always been overly ambitious in my entrelac experiments.

I had some fun over the holidays, just randomly pulling yarn out of the stash and turning into useful things without much worry about who it was for or what size it was supposed to be (so long as it would reasonably fit a wide variety of human beings). Mostly I followed patterns from my own books, but I did get a book out of the library on entrelac and made a few things from it. The one lonely ball of worsted-weight Noro I've had lying around for years got turned into a hat with an entrelac circle at its top (top photo). It was fun watching the yarn's long runs of colour work within the pattern.

The hat fit my head, but was a little too stretched-out to be attractive. It would work well for a child — or just someone smaller-framed than I am.

I also made a jabot-style scarf out of some odd balls of Rowan Calmer. The end triangles are entrelac, and then the scarf is just a ribbon of ribbed fabric connecting the two together.

It'll make a nice light-but-snug scarf for someone. The ribbed entrelac and scarf body have a extra benefit that they look good from both sides of the fabric. I hate scarves that have a right and wrong side.

This "just small wearable things" challenge is turning out to be fun! I can play around with shape and colour, but still finish quickly. It also means I don't have to spend a lot of time sorting through stash to amass a colourway with enough yardage to make anything big. Small and quick wins the stash-busting race.

the universe is complete by Katherine Hajer

hardwood 01.jpg

The last time I blogged about Sophie's Universe was back in May, when I was about to start the outer border. The top photo there shows it nearly complete, with just half of the final round to go. The nieces were nice enough to sit on it while I had it draped over my brother and SIL's sofa, which gives you a sense of scale. Apparently jumping on something Auntie Kat made is super-fun!

The final size of the blanket was about 170cm along each side. By area it's probably the biggest thing I've ever made, which led to a new challenge: how to photograph the thing so that the entire pattern was visible? I got this shot (still at my brother's, still with the last round to finish) by standing on a stepladder:

I wish it was straight-on instead of at an angle, but you get the idea. My cousins, who are a few centimetres taller than I am, offered to take a photo, but I figured I'd hijacked enough of the family gathering by that point.

So. This is stash-busting on a grand scale. I only bought one ball of white yarn for the entire blanket — it's used for the background of the last border pattern (the one with the red crisscrosses on it). I had more white yarn. I even had lots of white yarn, but not enough to make it around the perimeter without switching yarns, which would have made the blanket look a bit too raggedy and patchy. I was already playing with a certain amount of fire by using different shades and textures of white and cream throughout the blanket. It was worth the $8 in new yarn to finish it without making it look any shabbier.

I haven't blogged about the blanket being finished because it was finished in terms of crocheting, but not destination. The whole plan all along was to transform the stash into something useful and, with any luck, aesthetically pleasing to someone, and then give it away. I've had various suggestions (my initial idea was a women's shelter), but in the end gave it to Pegasus on Kingston Road here in Toronto. It will make a nice bright bed-topper for someone. Here's one final shot of it on my bed — which, again, for scale has a 150cm x 200cm mattress:

The pattern isn't my style since I'm more of a modernist, but anyone who's into folky/bohemian things should like it. I would definitely make something else by the same designer again. In fact, I already have my eye on something, if only I can collect the right yarns from my stash together in the right amounts.

busted! by Katherine Hajer

2016-11-14 11.31.02.jpg

Stash busting gets interesting when you have a limited amount of textured yarn. In this case, I had exactly enough lavender bouclé yarn to make this child's jacket (size 8-ish).

The yarn is chunky and the needles were 8mm, so the knitting was mostly straightforward. Because bouclé lacks stitch definition (duh), I tended to only work on it when I knew I could have a good session of it and wouldn't have to make detailed "where was I again?" notes.

Alteration: the only I changed (besides not using the called-for smooth yarn) was to add a narrow garter-stitch edge to the fronts instead of adding a row of single crochet during finishing. And, um, I'm pretty sure I changed the collar too, but at that point I was trying to get the thing done with the yarn I had left and not following the pattern so much. 

In the end I had a ball of yarn the size of a tennis ball, which of course at this thickness yarn is not a lot.  

The original pattern called for the jacket to be closed with a kilt pin. Yeahhhh, giving a kid a giant sharp pin is maybe not such a good idea in today's parenting climate. Instead I improvised an I-cord button and frog closure, which should please most health-and-safety concerns. Besides, it used up a few more metres of that stash white acrylic worsted I can never quite free myself of. 

I was going to donate the jacket to a charity shop, because the nieces are just growing out of this size (and I'm not sure they'd like it anyhow) but then Bonnie at Beaches Wellness Centre said her niece would like it. Works for me!  I have many, many items slated for making and donating in the near- to mid-future. 

Overall I'd say this counts as a positive stash-busting experience. Just as well, because I have the same amount of white bouclé with which to make another jacket! 

gigantism by Katherine Hajer

A co-worker gave me some yarn a few months ago. She's a loom knitter, but she hasn't had time for it lately, and was trying to clear some space at home.

Being given yarn can be a good challenge, especially if the giver works outside your usual zone. I received two skeins of chunky chenille, and four skeins (in two different colours) of chunky bouclé.

The bouclé was enough to make its own project from, but the chenille was difficult. Unlike the bouclé, the yardage wasn't that great, and all the patterns for it seemed to be blankets. Several people recommended making hats out of it, but in general kids don't like wearing bulky hats, and the colour strongly indicated making something for kids. 

Then I remembered this washcloth pattern. It's unusual in that it specifically calls for chenille. Even though the yarn was a lot thicker than what's called for, I used the recommended needle size and wound up with a dense, soft fabric. The finished cloths are about 25% bigger than the pattern predicts, but the central non-petaled part is about the right size for a washcloth, so meh.

Chenille can be weird to work with, and of course famously "worms" at looser gauges. These cloths should hold up nicely. 

I got some fruit-scented soaps to wrap the cloths around, and have designated them stocking stuffers for the nieces at Yule. Stash-busting and  gifts sorted out! Works for me.


practical whimsy by Katherine Hajer

I suppose it's in reaction to the giant blanket I just finished (which, er, I haven't done a final blog instalment on), but I've been churning out all sorts of quick items, using up stash.

I found this blog post about pan protectors on Pinterest, and it just seemed like such a good idea. Not only will it keep the pans from scratching each other — although you can see it's too late for the sample pan in the top photo — but they won't clatter so much when I put them away.

The pattern is from Vivian Høxbro's Domino Knitting book. She starts the book by giving directions for a series of potholders, each focusing on a different domino knitting technique. I've always been fond of this octagonal one, but this is the first time I've made it. The yarn is just standard dishcloth cotton worked on 4mm needles. The pattern called for smaller needles and DK cotton, but worsted is what I had in stash, so that's what got used. Turns out I knit more tightly than the book's sample knitters, so my pot holder is the same size as what's prescribed in the book despite the thicker yarn and bigger needles.

I can see making more. All of the ends are woven in as one knits, and there are no seams. The only thing I don't like about this one is that I wasn't very picky about the size of the circular needles used for the edging, and I should have gone up a size instead of down:

laid out.jpg

I'm doing a bit of an apartment upgrade at the moment, but very much on the cheap. For instance, I finally found a set of glass mixing bowls to replace the icky scratched-up black ones that were given to me. I wear a lot of black, but I do not like it in my cookware! (All right, except for appliances, but there's not much choice there.) They're a clear set of nesting bowls, so I think they'll be getting protectors as well.

This could be a really fun way to use up stash.

a tale of two baskets by Katherine Hajer

Two baskets, both alike in fibre content
In my fair-to-middling apartment, where we lay our scene
From ancient bedclothes break to new crocheting,
Where smaller stash makes smaller households more clean. 

Okay, enough of that! Really, from the blog title I chose, I ought to be mangling Dickens instead.

The two baskets have been in the to-do queue for a while. They're both made from this free pattern, which works up very quickly with a 10mm hook. The purple basket is made of four strands of Bernat Cotton Tots held together, while the yellow is an old bedsheet set torn into "yarn".

I find it interesting that both baskets are made of mostly cotton with some synthetic, yet the structure of the materials gives them such different traits. The purple yarn sheds horribly, and the basket started pilling as soon as I finished it. I'm not surprised Bernat discontinued the yarn.

The bedsheets came from IKEA, and lasted nearly fifteen years. They've definitely earned their basket afterlife. Like anything made from "rag" yarn, the basket has plenty of stray threads. I pulled quite a few out once I finished it, but most of them got crocheted in.

As for their purpose, both baskets, having been constructed 100% from stash, shall be used... to store stash. Even modest, upcycled baskets are far more stylish than the plastic shopping bags I'm using for the stash that won't fit in cubbyholes.

The end game is to empty out the stash storage, period, and then repurpose some of the storage. Onwards. 

the limits of the observable universe by Katherine Hajer

Work on Sophie's Universe continues apace. Last week the blanket finally got squared off again (see above), but I didn't get around to blogging.

The return to a square form means that the blanket creation is in its final movements. From here on out, there are several border patterns to construct, and then washing/blocking.

As of this moment, Sophie looks like this:

The blanket is now just over 1.5m across, which means that it's far too big to travel with. It also means that while before I was easily tearing through 2-3 rounds a night, it now takes a couple of nights to finish even one round.

The photo points to another, blogging-related problem. Not only is the blanket already reaching the edges of my (queen-sized) bed, but I can't get a complete photo of it anymore! The one above was taken standing on the very top of a stepladder, knees pressed against the carry handle, knuckles pressed against the ceiling plaster, and still I cut off a bit of one edge. Next time I'll have to clear the library/office and photograph it from the floor. I can't get any natural light in that room — it's the library because it's the only room in the apartment with walls and no windows — but it does have a good set of overhead halogen lights.

I'll still need a stepladder to get it all in, though.

The rounds are now sufficiently big (1.5m x 4 = 6m around!) that I had to cave in and buy some white yarn to make it across the finish line. It's not that I don't have more white odd-balls — I have a lot — but they're all too small to last through one circumference. I decided to get a 790g super-size skein, not because I'll need that much, but because I didn't want to be stingy and then get caught out. Besides, maybe I can use it with the left-over bits of odd-sized whites to make something else. I have a few candidates already.

Meanwhile, the Toronto summer has hit in full force, with weather advisories all last weekend due to the heat and humidity. The sooner I can get this blanket done, the better!

the universe is expanding by Katherine Hajer

I think I've mentioned before here that I basically have three levels of active-ness. If I'm fully well or just a wee bit ill, I'm able to write. If I'm worn-out or outright sick, I can knit or crochet, so long as the pattern isn't too involved. If I'm truly suffering, the best I can manage is to hide under a pile of blankets and quilts on the couch and scowl at whatever nature documentary on Netflix I haven't seen too many times yet.

Surely I'm not the only person who watches nature documentaries when they're sick. They were one of the few types of shows my entire family would sit down to watch when I was a kid, so they have a certain nostalgic feel to them, even as they show polar bears stranded on ever-shrinking ice caps. Also, I've watched so many that if I doze off into a fever-induced slumber in the middle of one, I can wake up whenever and not have really missed anything.

I've been ill for the past two weeks with some sort of sinus infection, so not much writing has been getting done (grr). For a few nights, I was too busy having fever and chills to get any needlework done either. Right now I'm better but not yet illness-free, so the stash-busting has had more progress than the novel-writing.

The photos show that I'm still working on Sophie's Universe. I'm still not sure it's not ugly — I seem to say that about all my blankets — but it's definitely a lot of fun to do. Every single round has something or other going on. I've learned a lot about the mechanics of overlay crochet, and about what post stitches can do. Everything is still 100% stash. I even [sigh] found a big ball of leftover white yarn I am setting aside for the broad border section with the negative-space butterfly motifs.

The cut-off corners will eventually become the blanket's sides, while the sides with the rows of bobbles will eventually narrow to points. The central square will be tilted 45 degrees in the final version into a diamond. Right now it's almost exactly a metre across; well on its way to the planned finished size of 1.8 metres square.

By which time I hope to be doing more writing than needlework, and to have used up lots and lots of stash.