knit

the crowdigan by Katherine Hajer

This became one of those epic knits for me, one that got considered for “abandon and re-use the yarn” status several times over.

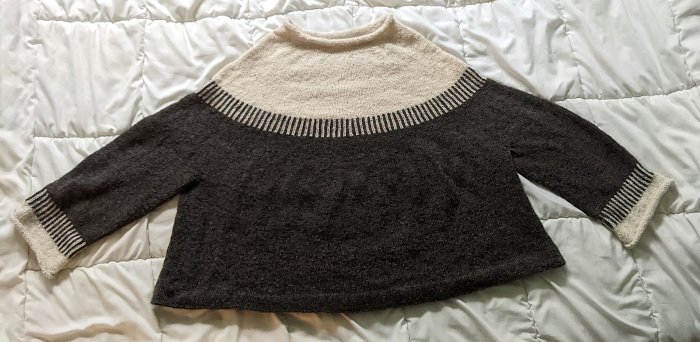
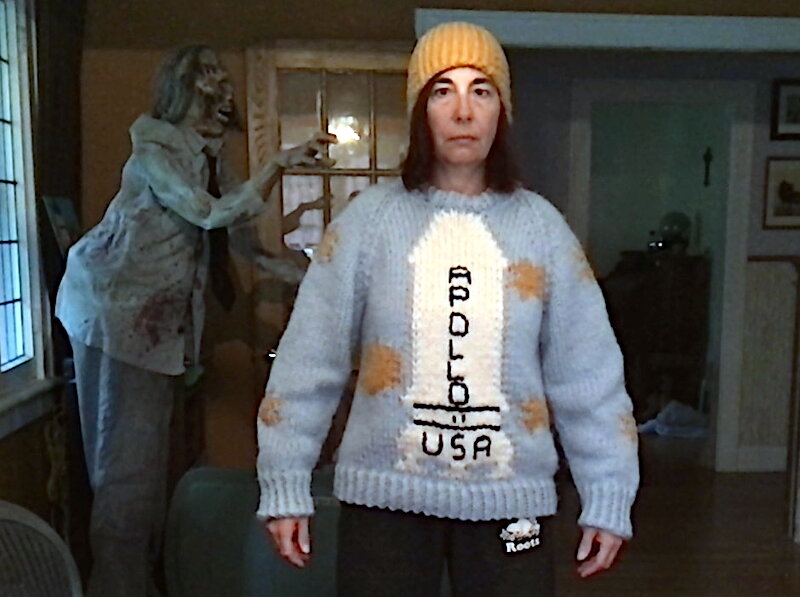
Just for reference, I am 175cm/5’9” and usually take a 2XL in retail clothing pants and tops, or a 3XL in coats and jackets (because they never account for what you’re wearing underneath!). This cardigan goes down almost to my knees and is 4-5 sizes too big for me.

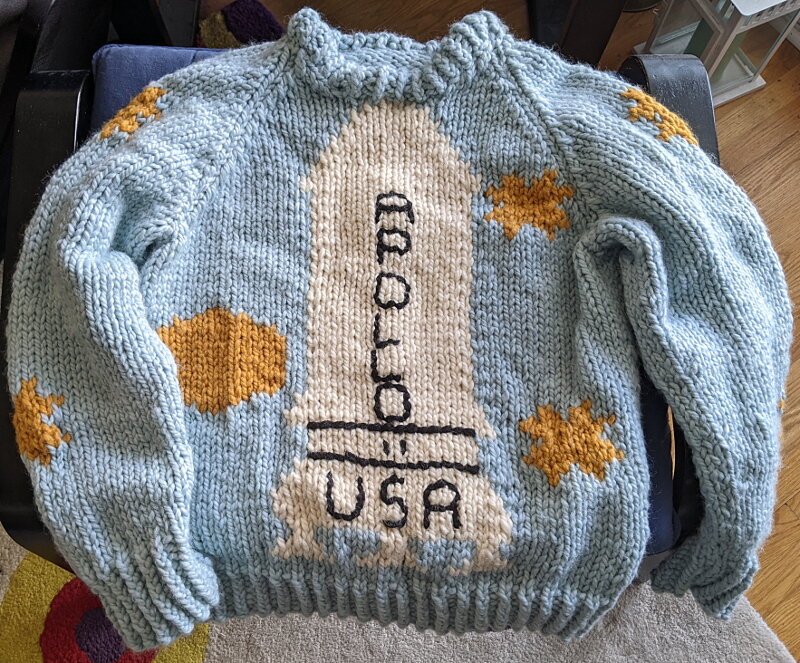
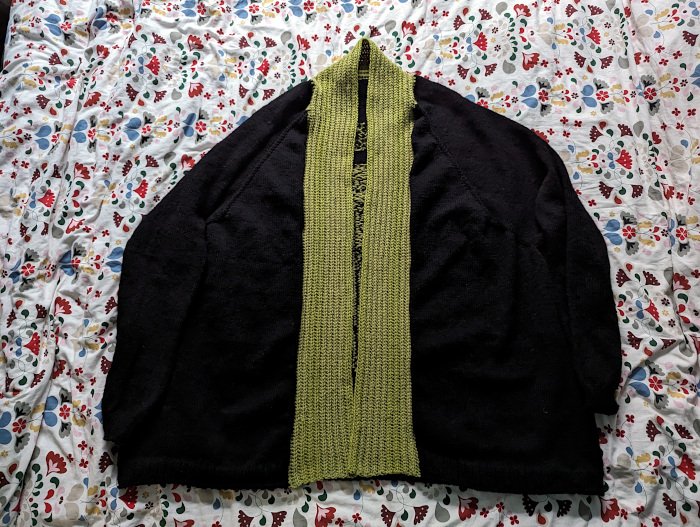
The pattern is The Possibility of Crows by Harper Bee, which I got in kit form from Bistitchual (the pattern links to them since it’s not on Bee’s site). The way the prices and sizing worked out, it made sense to me to just get the largest size and go for the oversized, drapy style I like in these kinds of cardigans anyhow. It might have been overkill, because the armholes go down to my waist, but the “blanket with sleeves” effect is very pleasing, and I hope to get many years of wear from it.

The design is top down, which everyone seems to love but me. My usual objections stand: this got to be a royal pain to cart around when it was closer to done, and I a large percentage of my knitting on public transit or while waiting for other things to happen. I also don’t like working on sleeves while an entire cardigan hangs off them.

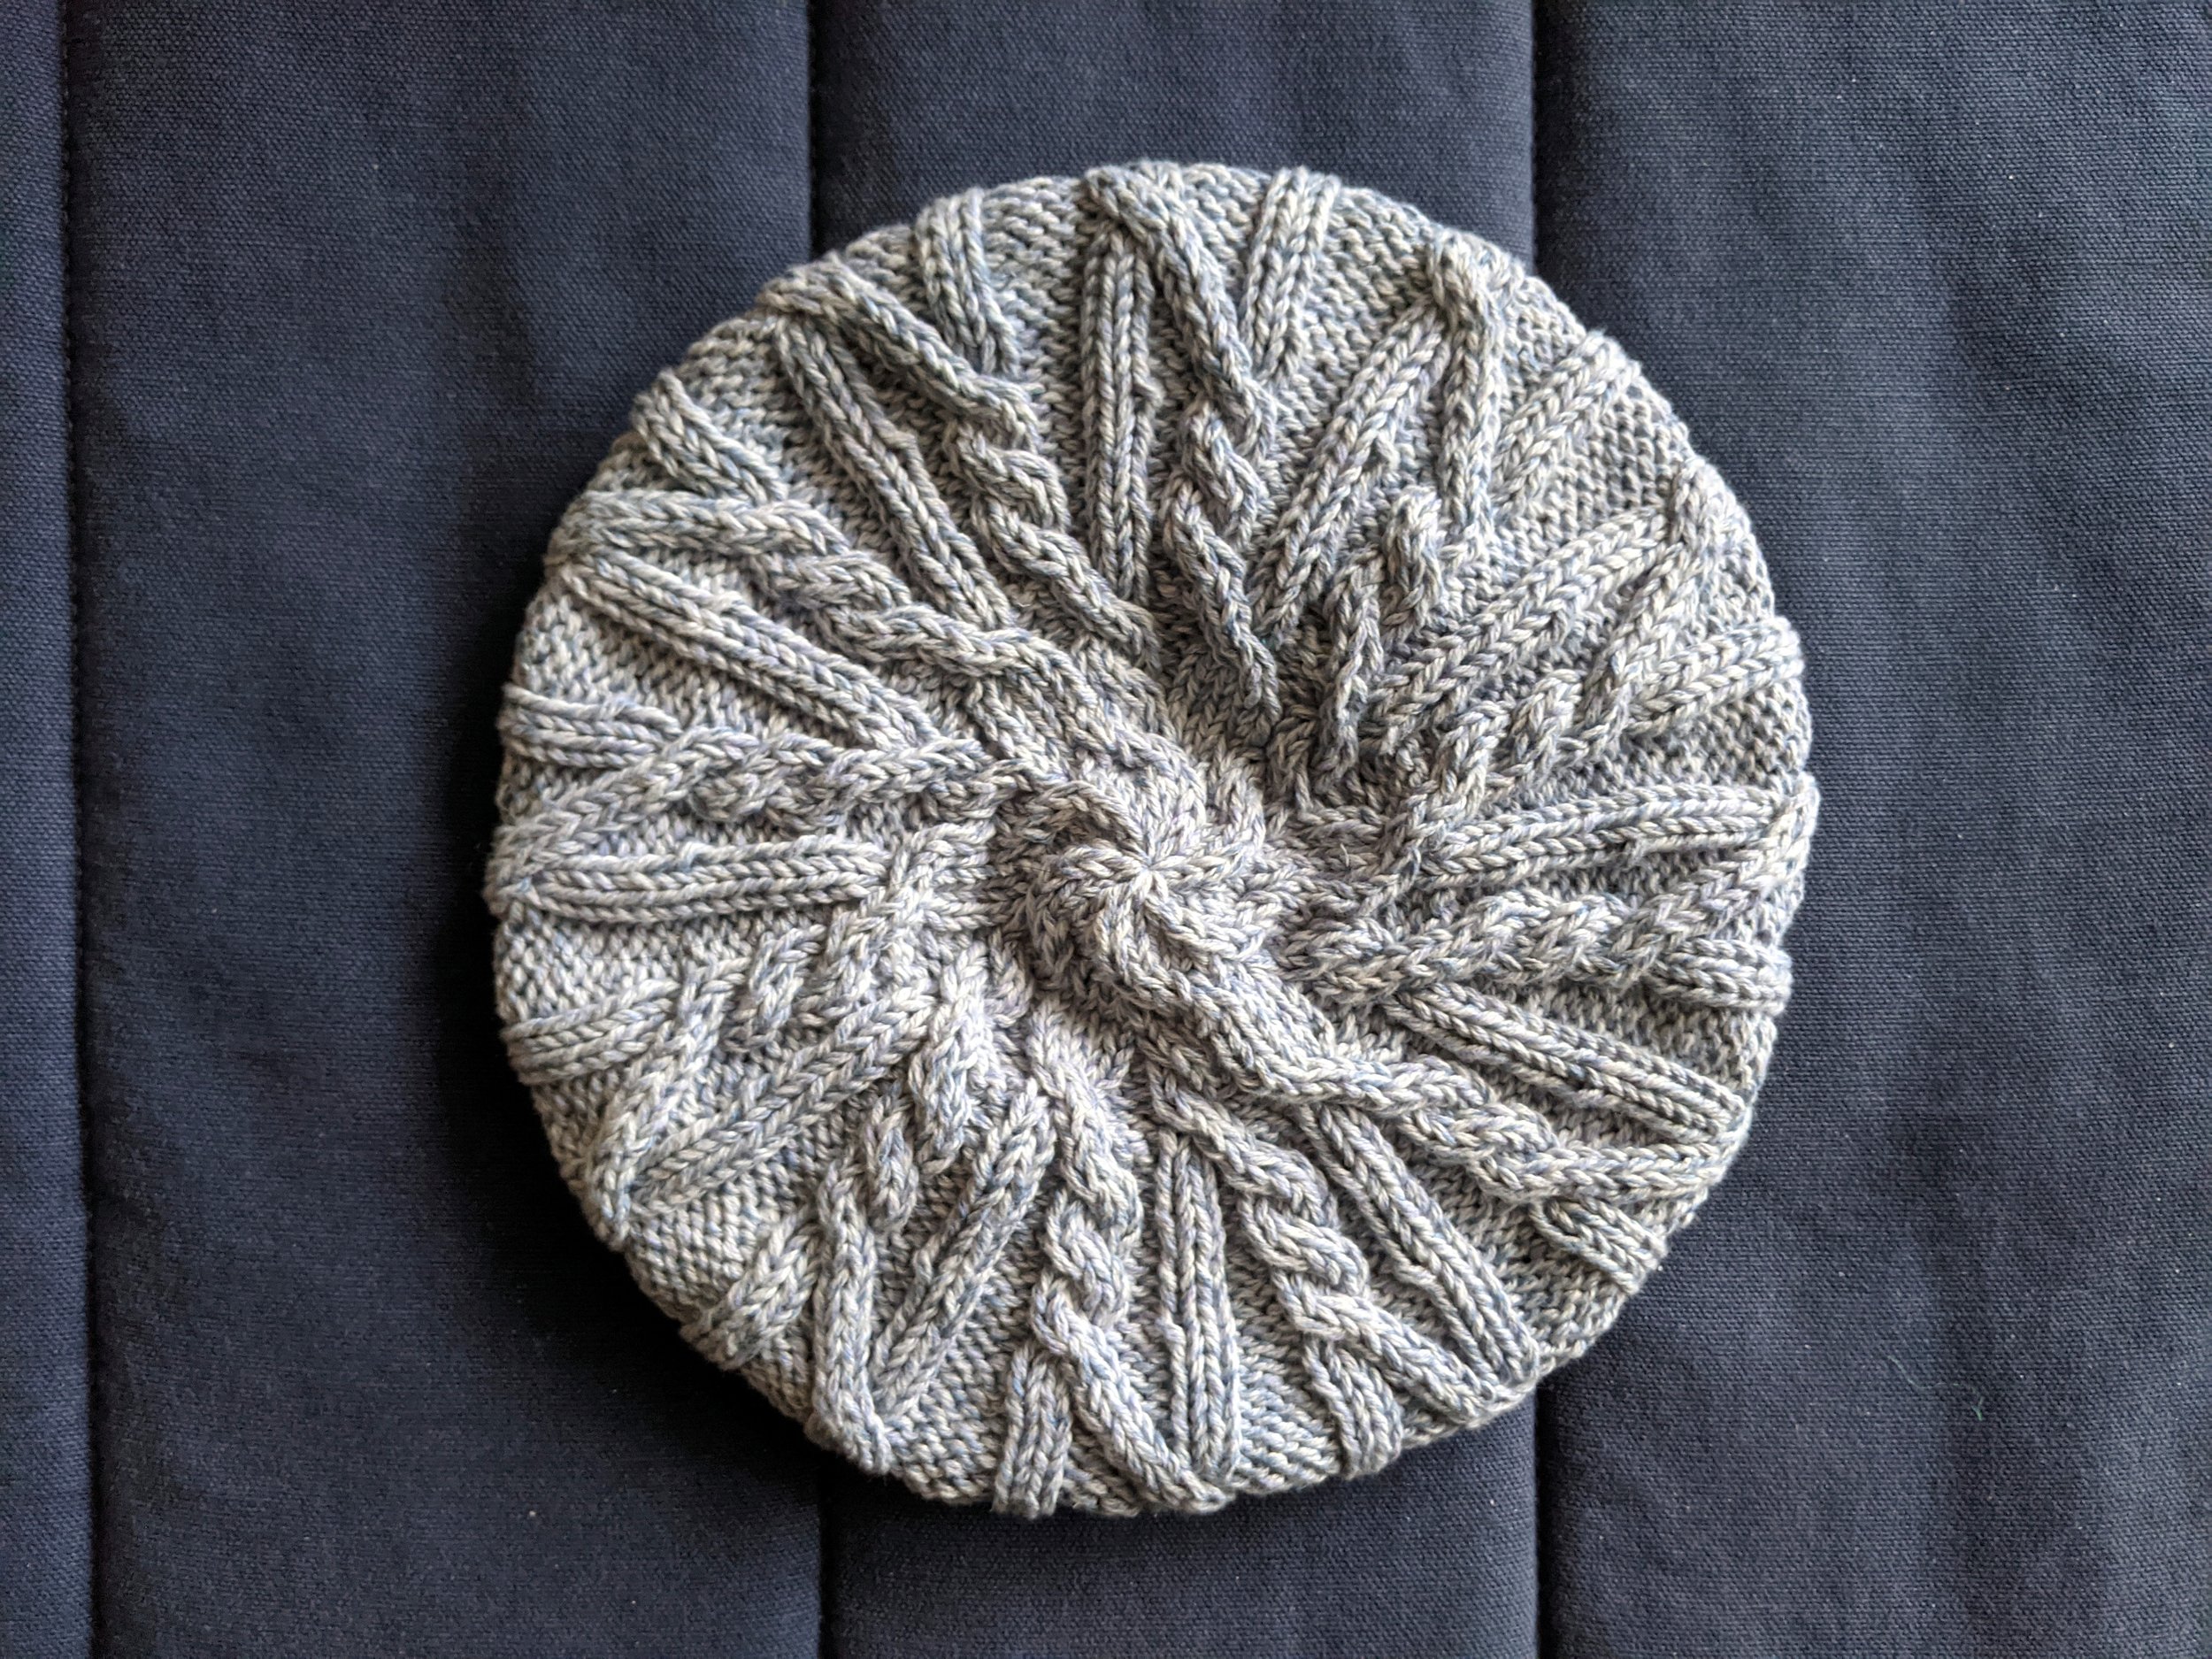
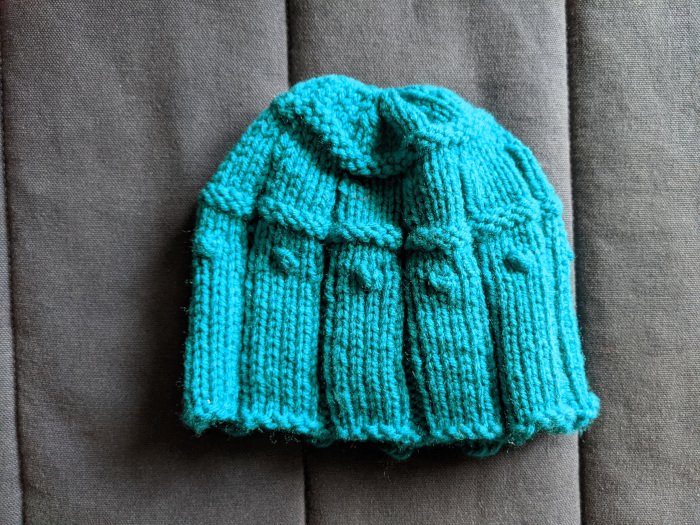
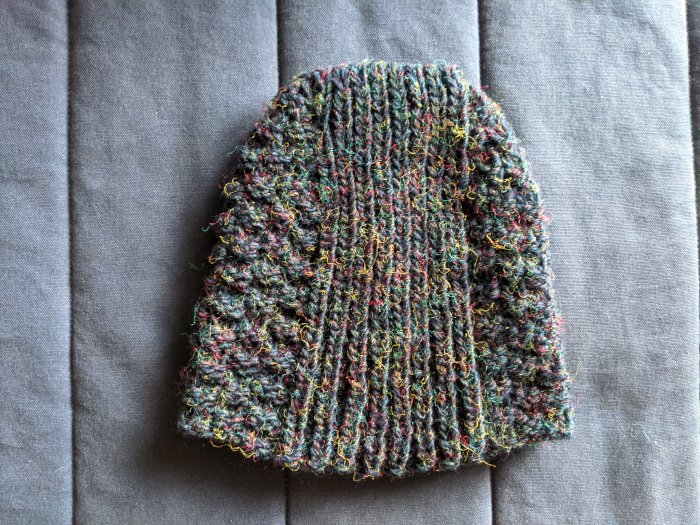
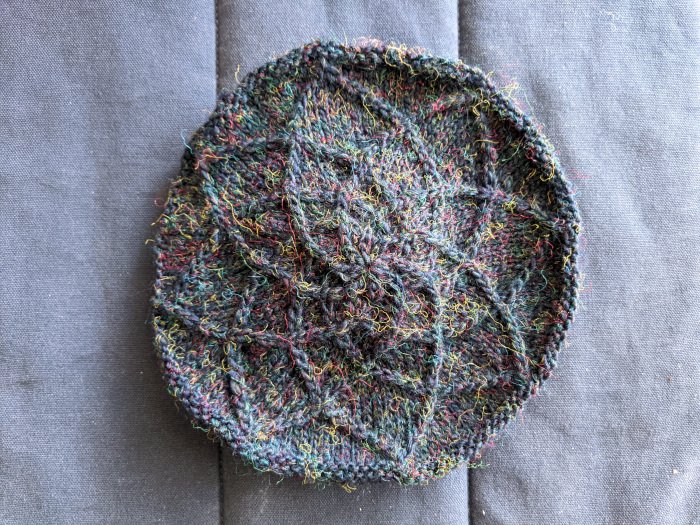
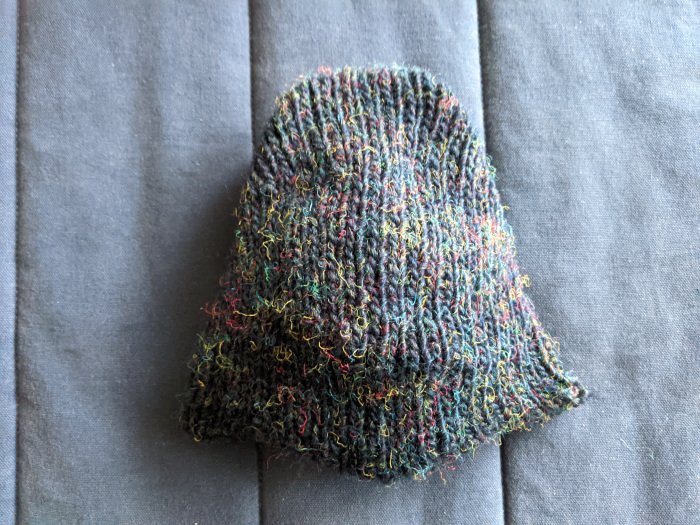
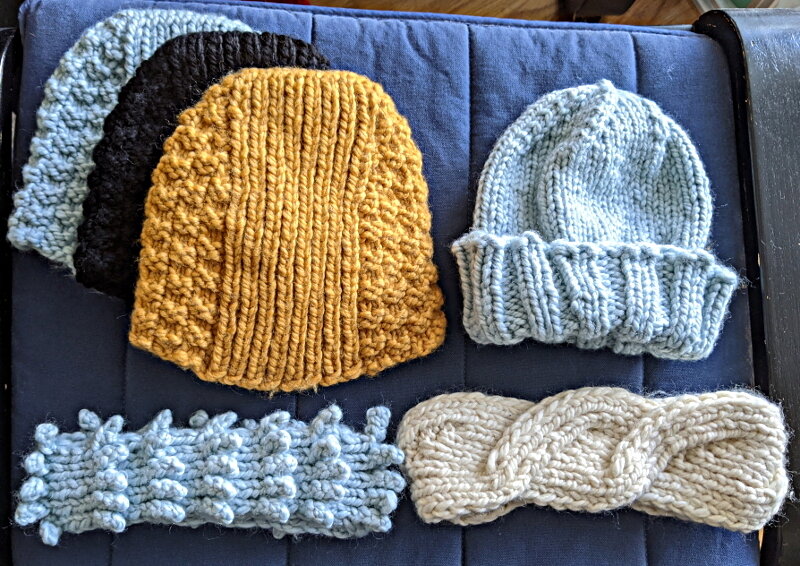
Buying the yarn as a kit was also a concern, as sometimes kits are stingy with yarn amounts, so I am please to report it was not the case here. I have two and a bit balls of black left over, and just under one ball of green. I expect to turn them into a watch cap or suchlike after I’ve finished some other things which are already on the go. I did like that Bistitchual lets you choose any combination of foreground and background colours that you like from their stock for the kit.

Modifications: I should have made this into a pieced-and-sewn construction for my own ease of knitting, but I didn’t, and it’s done now. I changed the 1x1 twisted rib edges called for in the pattern to 2x1 mock rib for the body edge (because there’s no point in having an oversized swoopy cardigan pull in at the bottom) and 2x1 real rib for the sleeve cuffs. I also purled the one stich between the sleeve decreases, because for me doing that always leads to a smoother shaping.

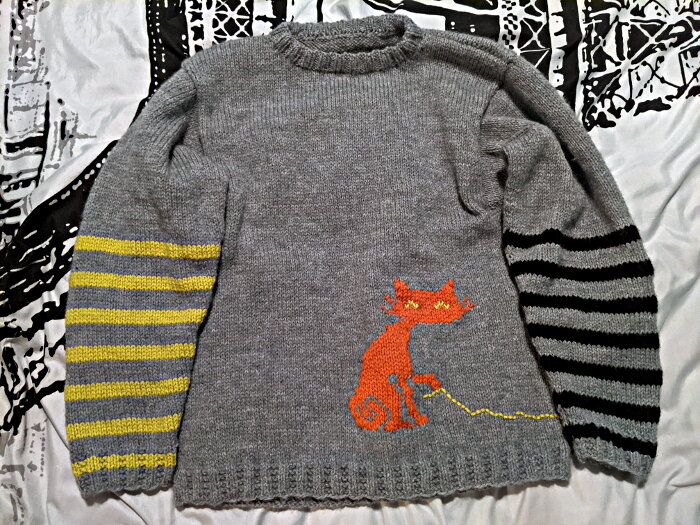
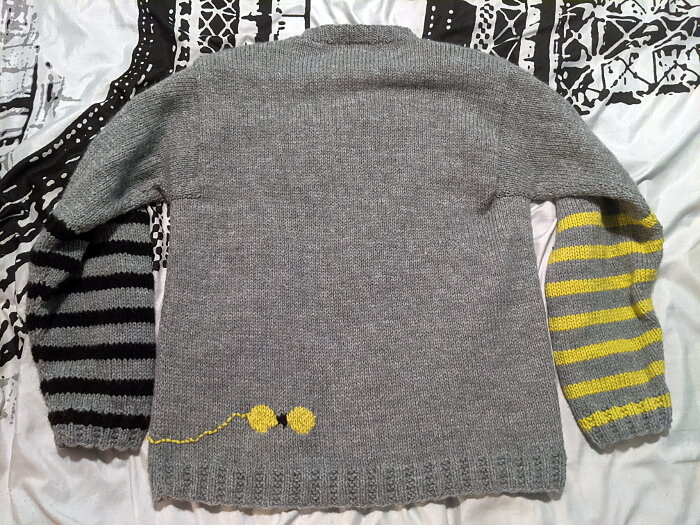
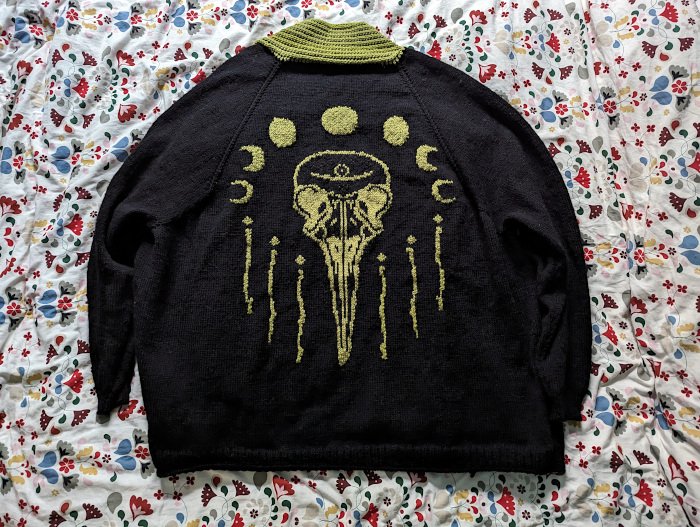
I also didn’t quite do the recommended intarsia at the back. The moon phases and candles/wands are each their own intarsia motif, and then the crow’s skull is one big motif. The main body black yarn was carried behind the green throughout. This made each separate motif slightly thicker than the surrounding background fabric, and therefore raises them slightly, kind of an applique effect.

Lastly, I wish I had gone with my gut feeling to change the instruction’s eyelet increases to make-1s, but again, it’s done now and I probably won’t even think about it once I get used to the cardigan as clothing, not project.

Challenges: maybe it was just from working with black and having 500+ stitches on the needles at some points, but I wound up ripping out more than usual for this one. I’ve made way more complicated knits than this, but I just didn’t have the brainpower this time out. The cast-on and initial shaping took 3-4 tries, and then I had to rip out 30+ rows just when the intarsia was getting complicated, because I mis-read the instructions for when the armhole shaping changed increase rates. The last mistake to be fixed was when I was finally done the colour work, spread out the project on a flat surface for the first time in ages (remember I said I frequently knit on the go?), and discovered I’d twisted the fabric when putting the sleeve stitches on hold at the bottom of the armhole. Fixing that required snipping a stitch on the very last row of the armhole at the front, taking out just the one row, untwisting the fabric, and grafting the unravelled row back into existence.

Speaking of armholes and sleeves, thanks to the oversizing, the armhole stop at the top of my hips, I can press my elbows into my sides without touching any of the cardigan. That gives a sort of dolman effect, which works for me, but that the sleeves at this size are 55cm/22” long from the underarm does not. I do have long arms, and back when I was thin my underarm-to-wrist measurement was 47cm/19” or so, but I find now that I’m in plus sizes I don’t need the extra length as much. I should have decreased more frequently to make shorter sleeves.

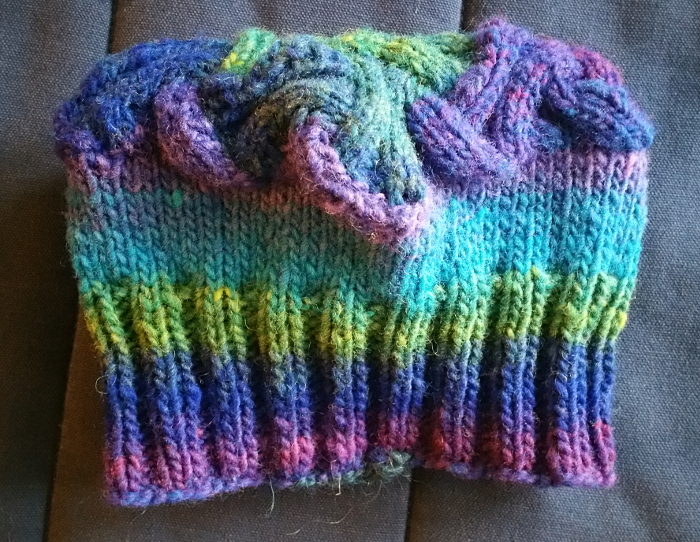
I had one more surprise working the collar: depending on the light, it looks like there are different dye lots mixed together, although I can’t find a different dye lot in the ball bands (they were in a heap on my coffee table because I did the collar in only three sittings). It doesn’t really show up in natural lighting, and it goes with the overall theme of the cardigan, so I’m not that fussed about it. it makes it less industrial-looking than most clothes, including many hand-knits made from highly-processed yarn.

The temperature dropped in the last couple of days it took me to finish. After working on this project off and on for over a year, I’m glad I get to wear it.

simple is good: cedar point sweater by Katherine Hajer

grey & cream sweater laid out

I’ve had the Cedar Point sweater by Espace Tricot on my to-do list for a while now. Which is weird, because it has a lot of things about it I usually avoid:

  • I don’t usually make yoke sweaters for myself because they often don’t fit me well.

  • I don’t usually like making top-down sweaters because they get awkward when it’s time to work the sleeves (with an entire sweater hanging off the sleeve in progress).

  • I don’t usually go for unfinished edgings for myself. This last one is just because I had CURLING EDGES ARE BAD stamped on my brain at some point. It has softened to CURLING EDGES ARE CUTE ON KIDS BUT NOT YOU, which I suppose is a sort of improvement.

But I kept coming back to look at the pattern, and coming back to it, and I even saw a knockoff for sale in a shop window in my neighbourhood a couple of winters ago. Finally, after perusing every single version posted to Ravelry (and there are lots), I decided to make a cream & charcoal version over the beige & black original, because on top of all those other reservations I don’t like beige against my face because it makes me look sallow.

For the yarn, I used one strand each of Winter Glow Solid and Diablo. This more-or-less matches the original yarns called for, just more economically. Altogether the sweater has wool, mohair, and synthetics in it, and feels super soft with just a slight aura of fuzz. The fabric came out very light and thin, despite being made from the double strand.

Alterations: I made the sleeves first, then finished the body (opposite for a typical top-down pattern). I also made the sleeves full-length instead of bracelet-length, because my current set of gloves don’t have gauntlets.

Amazingly, for once in my life my gauge was a little too loose, so I wound up making one size smaller than I had originally planned, and it’s still generous. I can see myself wearing this instead of a coat on a crisp fall day. Ideally I’ll be sitting on a patio, sipping a warm beverage. Later, when the annual southern Ontario deep freeze hits, the sweater will be a welcome extra layer under my coat.

There is something about this design. I got a lot of compliments from friends, family, and random strangers when I was making it. It’s a very basic design — it would work great as an introduction to round yoke sweaters and stranded colourwork — but something about it just appeals.

Because of its generous shape and sizing, the round yoke fits over my shoulders very comfortably. I finished the neck and cuffs without any edging as the pattern instructs, but decided to hem the bottom edge. It makes the edge lie flat and bell out in a very pleasing way when worn.

The pattern is excellently written, and free! Espace Tricot has a whole collection of free patterns on Ravelry, and they all cover a wide range of sizes (plus there’s enough information to draft a missing size or make alterations if you need to). I’ve already got some other ones in mind to make.

a shining example of conquering procrastination by Katherine Hajer

the finished jacket, featuring the carpet pattern from the Kubrick film

What do you remember from November 2018? Personally, I don’t remember much, except that I commuted between forty and ninety minutes each way to and from work most days, and sat in a cubicle trying to get things done while I was there.

And also, I was not having very much luck figuring out Yule gifts for my friend Cheshin. We have this rule: no buying or making gifts unless you actually think they are cool and would be something the other person would like. Some years, this is easy, and the challenge is to decide how many gifts are too many.

Some years, the world is very uncool and boring and I wonder if a gift certificate would really be that terrible of a cop-out.

November is late for me to be gift-hunting for Yule at all. I usually have it all sewn up by then, and it was really bugging me I was coming up empty-handed.

On that day in November 2018, though, inspiration was sitting in my personal email. I’d signed up to get the newsletter for this American rockabilly clothing store (they carried plus size, and any variety in plus-sized clothing is to be celebrated). And this time, they had an entire newsletter devoted to their clothing line patterned same as the carpeting from Kubrick’s film adaption of The Shining.

And it occurred to me that this was one thing Cheshin might like. I know she likes The Shining, and she also likes midcentury modern geometric patterns. She also likes the colour orange.

Cheshin wearing the Shining jacket

I checked Ravelry: someone had already charted out the carpet pattern for knitting (thanks Amy Schilling!) With the chart in hand and Ann Budd’s The Knitter’s Handy Book of Sweater Patterns along for the math, I worked out a jacket that was somewhere between a bomber jacket and a classic Chanel. There are some projects on Ravelry that use the Schilling chart to make more conventional knits, cardigans and hats, and while it seemed like those knitters had rendered exactly what they were aiming for, I wanted something that said, “this is knitting!” a bit more quietly.

So hems for the lower body and cuffs, and an i-cord button band instead of the original rib (I nearly did a zipper but lost my nerve). The buttons are plastic versions of the leather-knot buttons which were so popular in the late 70s/early 80s.

The chart itself could have been worked with stranded colourwork, but that would have meant some rows had three colours per row while others had two. Even at two, I was using 100% wool. That’s a warm jacket, both too warm for spring and fall or indoors, and not warm enough for an actual Canadian winter day. Intarsia seemed the best bet, and I have lots of experience working intarsia, so “all those ends” didn’t bother me.

And yet… the thing took four years to finish.

Partly that was because I kept working on other projects: knits for the nieces and nephews, birthday presents for various relatives, “quick” items that turned out to be not so quick. Cheshin knew I had something “big” I was making her, and no doubt guessed it was something wearable, but not exactly what.

She even asked me at one point if I thought the carpet from The Shining would make a good knitting pattern, and I just kind of blathered.

Joining a new knitting group online helped the work continue, as did pulling it out of UFO storage and realizing I had more done than I thought.

Yes, there were a lot of ends, but I switched between darning in ends and knitting sleeves, and that worked out well. I also did the I-cord edging before I sewed the sleeves on, so there would be less fabric to wrestle with as I went around the neck. The I-cord edging was done twice (the first time it turned out too tight), and it still didn’t feel like that much work.

At the same time, am I happy it’s done? Oh yeah. Also guilty. But happy.

ten hats by Katherine Hajer

Last summer the ever-generous J-A and I each made a set of hats to donate to Hat not Hate, an American organisation that hands out hats to kids while teaching them how not to bully (and how not to be bullied).

The logical thing to do when making hats for a charity drive is to pick a simple pattern you can make in an evening or less, and then make it over and over, to maximise how many hats your produce.

I find that just doesn’t work for me. I get bored, and then my output slows. Instead, I gathered up all the patterns I thought looked cool, or that I’ve always wanted to try to make but never had a reason to, and matched them up with stash yarn.

The rules for Hat not Hate in terms of yarn is that it can be any colour you like, so long as it’s mostly blue. The blue can be anything from the light icy blue of the toque, to the teal of the rivet hat, to the navy tweeds of the simple hat (the navy tweed was donated by Lynda Tam — thank you!). All of the hats were stash, and it was a lot of fun to match yarn to projects.

Notes on each hat are below.

cabled beret

This is from an old copy of Vogue Knitting. Since it’s supposed to be a summer hat (!), I made it in blue-and-white marled cotton. The cables are integrated into the bottom ribbing, which was fun, as was the tidy finishing of the cables at the centre top of the beret.

crocheted cloche

This was from a recent-ish Interweave Crochet. Honestly? it was a complete pain to make, but I was still glad to make it. The main body stitch was interesting; I could see it being used once upon a time to make a bathing cap in the days before those all switched to latex.

raindrop bobble hat

This is from Norah Gaughan’s Knitting Nature book. It’s very bobbly and otherwise textured, which is unusual these days, but still seemed aesthetically pleasing. I hope the recipient agreed.

rivets hat

This is from one of Elspeth Lavold’s books, The Embraceable You Collection, based on the clothing carved on China’s famous Terracotta Army statues.

simple hat

This version was my sixth or seventh rendering of this pattern. It’s a fun, quick hat to make, and so far everyone I have given one to has talked about how much they like how it looks on them and how well it fits. It also has time travelling abilities, because people have guessed it’s everything from vintage late 60s to vintage 90s (which is mostly correct) to a brand new design. From The Shape of Knitting by Lynn Truss.

sunflower beret

This is another one from the same Norah Gaughan book as above. It went faster, and is not as complicated, than I expected, and the top especially is a very satisfying knit.

tilda reverse flat cap

This is another one from The Shape of Knitting that I’ve made more than once. The brilliance here is that for most of the hat, you’re working short rows around just the top half. It’s basically a slouch hat with all the excess fabric removed, and a much more interesting ending.

toque

I got this pattern from the Lion Brand website when I had finished Cathy’s The Shining Apollo sweater. I made three versions of The Simple Hat (fourth version included here and described above), and then made the Lion Brand pattern as another basic hat friends and family might like.

Nobody wanted it, while the Simple Hats got snapped up with requests for more. My mum has two of them now.

I do think the toque will appeal to someone. Probably someone who is used to only getting hats from major chain stores. It has a certain kind of plainness to it.

two colour beanie

This is the sort of hat that happens when you are trying to use up stash, but don’t have enough for even a hat. I used a basic free beanie pattern found on Ravelry for the base, and then did a very plain stranded colourwork section for the transition to the other colour, rather than just doing an abrupt change. The colourwork hides the beginning-of-round job and makes it a bit less plain.

crocheted lace beret

Of all of the hats, this might be the most “statement” one. I pictured a different imaginary kid as the target recipient for all of these hats, but for this one, I specifically imagined a kid with super-curly, high-volume hair. Of all the hats, this was the one I could see as most likely to be worn all day, not just outside. It’s a big enough beret with big enough openwork that it lies somewhere between a proper beret and a 1940s-style snood.

The pattern comes from Crochet Red: Crocheting for Women’s Heart Health. The pattern was pretty easy to execute once the first few lace rounds were established, and I found the increase/decrease method interesting and fun to do.

The hats all got very carefully stuffed into a padded mailer envelope and shipped off to New Jersey. Since then, Hat Not Hate has changed their hat collection method, and… I don’t know, I like their cause, but supporting a foreign charity just wasn’t as satisfying as the work I’ve done for local/Canadian groups in the past. Since then, I have been making hats and scarves from stash in all sorts of colours, not just blue. Next autumn, when the charities are collecting warm wearables again, I’d like to give them somewhere locally. I always try to make things people will want to wear, so hopefully everything will find owners who are happy to have them, not just because they need a hat and rely on community groups to get them from.

clutter to... usable clutter? by Katherine Hajer

four hats and one set of four coasters made from odd balls of yarn

There’s stash, and then there’s “it’s in my way” stash. For the first pandemic Yule season, I made the nieces and nephews some fun hats and sweaters. I also managed to finish one earflap hat (the first one shown in that earlier post).

That still left rather a lot of stash yarn. Too much for me to put away in my yarn storage, because… it’s already full of stash yarn.

Meanwhile, the ever-generous J-A gave me some assorted odd balls of yarn from a box she’d won.

All of which means that right now, I’m having some fun just making whatever the yarn moves me to, with the caveat that it has to be useful to someone, somewhere.

In the top left of the photo is a geodesic dome hat (aka a Buckminster Fuller dome). Something about my gauge compared to the pattern gauge was off, hard to say what because the pattern was on the vague side, so I added another row of triangles and made the earflaps small single triangles instead of the larger four-triangle shapes from the pattern. The colours were fun to work out for this one. I made a rule that two triangles of the same colour could share points but not an entire side.

In the top right is a beige knit-and-purl textured hat made from one of J-A’s prize skeins. Yes, I have made this pattern about seven times now. It’s quick and interesting to knit, and all recipients report the hat fits them well. The ribbed band goes from the forehead to the back of the head, and stretches width-wise to accommodate the wearer’s head.

The blue watch cap in the bottom left is also very stretchy, and has a neat diagonal panel wandering through the main fabric to keep the knitting from getting monotonous. I suspect it will fare better against the wind than a standard watch cap, because it’s in worsted-weight yarn , but only 3.5mm needles instead of the usual 5mm-ish.

The peppermint stripe had (seen here folded into quarters) will also be great against the wind, because the floats on the inside block the stitch holes on the outer layer. It’s a simple pattern that gets very mesmerizing and soothing to knit.

And then… There was a ball of cotton-based yarn from J-A’s stash that just didn’t want to be a hat. It’s the type of yarn where a biggish strand of unspun cotton is wound with a thin thread, creating a slubbed yarn with a light thick-and-thin texture. It’s not particularly stretchy, and the large amount of off-white doesn’t lend itself to items which might get dirty easily. Instead, I found a free crochet pattern and made a set of coasters out of it. Four coasters came within a couple of metres of using up the entire ball of yarn. I like the results — to me, the colours make for a 1950s-1970s look, almost like a raffia effect. I can imagine someone setting down some fruity cocktails on top of them.

It would be nice to say this made a substantial dent in the stash and that my living room is a bit less cluttered now, but I’ve still got about… two kilos of yarn, say? left. Two items are already on the needles and will contribute to the next blog post.

slipper evolution by Katherine Hajer

I’m back to prototyping slippers made closer to shoe-making construction. Unlike last time, where the slippers were all for other people to borrow, these are all for me. I wear out slippers frequently enough that making a clutch of slippers and setting them aside for next winter is a good idea. Besides, it’s using up stash!

The first pair I made was from a free Bernat pattern which renders slippers that look like Ugg boots. I’m not a fan of actual Ugg boots, but they work out to be great slippers when the annual Toronto deep freeze happens in January-February.

The next pair were me improvising on a crocheted double sole to create ballet-type slippers. I did one pair in the regular acrylic leftovers I use for slippers, and one in dishcloth cotton for when the weather is in between slippers and bare feet.

The teal-and-lime pair are my most recent experiment. Crocheted double soles as usual, but then I pick up stitches and knit the uppers. That way the soles have a nice dense fabric (and then doubled), but the uppers get all the stretch and flexibility from knitting. (Yes, crocheters will claim I can crochet the whole thing, but since I know how to do both, I’m happy to switch between the two fabrics to get the effect I want).

I’ve currently got a medium-grey pair on the go with orange soles. They’re basically the same as the teal and lime slippers, but I’m trying to refine the shaping a bit (making the toe box narrower).

Next iteration, I want to try to fit the soles to my actual foot size better. The ultimate goal is to get a pair of these onto flip-flop soles to make true indoor (and maybe outdoor?) shoes.

thick and quick and a little bit sick by Katherine Hajer

There is a certain, um, DIY project which I started work on [winces] in November of 2017.

It’s supposed to be… it’s still going to be a gift for my friend Cathy.

I’m actually very close to finishing it now. I’m on the last piece I need to do before final finishing and assembly.

Danny in the sweater that launched a thousand conspiracy theories.

Danny in the sweater that launched a thousand conspiracy theories.

But it’s not done yet, and that’s why last winter I took a week out to make her a version of the Apollo 11 sweater that Danny wears in The Shining.

I actually got to see the original sweater at the Kubrick exhibit TIFF held a few years ago. Remember that? We used to go to public buildings and see exhibits in person. Up close, it was abundantly clear the sweater had been hand-knitted (well, you could tell that in the film too), but also that it was probably made from a hobby knitter pattern, as opposed to something designed for a garment factory or paid piece work.

Kids modelling the original sweater pattern, and probably breaking today’s safety standards for toys with those helmets.

Kids modelling the original sweater pattern, and probably breaking today’s safety standards for toys with those helmets.

I went poking around the web for the pattern. There are a lot of imitation/reimagined versions of the sweater out there! But, miracle of miracles, I managed to find someone on Etsy actually selling PDFs of the original commercial pattern.

The pattern is very late 70s/early 80s in so many ways. The intarsia details are only on the front and sleeves. There are only two sizes, and they’re very close in actual measurements. There’s no full fashioning on the raglan seams. Perhaps most noticeably compared to today’s patterns, the neck is done on straight needles and then seamed over one of the back shoulders. That last bit would horrify a lot of today’s knitters, but hey, they’d already be freaking out at the mandatory seaming the intarsia demands.

I did some math with the help of my copy of Ann Budd’s The Knitter’s Handy Book of Sweater Patterns, and figured out that if I followed the instructions for the smaller size but just made it longer, I could make an adult-sized sweater for Cathy.

To get the sweater to be the right size with minimal math, I used an even thicker yarn than the 70s chunky called for in the pattern. Lion Brand’s Wool-Ease Thick & Quick has a name with a lot of assumptions (just because the yarn is thick does not make the thing quick to make), but it got the job done here.

Then, because intarsia, I found myself with a lot of leftover yarn. I don’t tend to have a lot of yarn in this weight in my stash, so I decided to use it up by making a bunch of hats and winter headbands.

The results are in the gallery below, including Cathy being a good sport and doing her best Danny imitation.

And now I really have to finish the actual, main gift project!

brei-blast by Katherine Hajer

Times Being What They Are, I wound up making nearly all my gifts for Yule 2020. At first I was hoping to make at least some on my machine, but that didn’t work out.

Here’s a gallery of what I managed to photograph before it got dropped off at various family curbsides. All of the hats except for the play crown are from an old 1990s Vogue Knitting On the Go book I have.

more fiddle faddle by Katherine Hajer

Ouf.

There is a folder on my laptop called "working folder". It's where I throw photos destined for my blogs before I upload them, so I can do the usual cropping, level adjustments, and whatnot.

Usually I am taking photos only two or three blog posts ahead. When I am on a roll, like I was at the beginning of the year, I will take photos, upload them, and then have the blog all ready and scheduled weeks and advance.

And then, you know, things happen, and it all falls apart again.

These soap sacks were made for Cheshin for her birthday, which was last spring, which gives you an idea of how far behind I've got. I found some interesting soaps at a local shop and decided to include them as part of her birthday present, but they were minimally packaged with just a cardboard band around the soap. Minimal packaging is all well and good, but it might not survive being mailed to Ottawa and it might not be very protective of the soaps if they aren't used right away.

So I went on Ravelry, where all fun small patterns are catalogued, and found this soap sack pattern. There are lots of different patterns for soap sacks on the net, but I liked this one because it is reusable; most patterns have you sew the soap into the sack and are thus for one-time use.

Besides having the benefit of being free as in beer, the soap sacks feature my favourite "sandwich baggy" closure for pillows and, um, soap — no fussing with knots or drawstrings. The only mod was to change the garter stitch heart motif to a more-practical-for-scrubbing diamond.

I used up an entire ball of mystery yarn from the stash (definitely cotton, but beyond that, no clue). Cotton seemed like a logical choice since it's what gets used most often for handmade washcloths, but Cheshin gave me a bar of soap for my birthday which is entirely enclosed in felted wool, the idea being it will get more felted and therefore more scrubby in the shower. I'm still working through a big bottle of shower gel, but I think the felted soap will be up next.

Because of course showers is where fun experiments happen. Isn't it?

a not-saccharine baby blanket by Katherine Hajer

My youngest brother is expecting his first baby, and both he and his wife have made it clear they are not into cute-overload, saccharine baby things. I was talking this design constraint over with J-A, and happened to mention my brother is also heavily into NASA, especially the Apollo era. She came up with the idea of making a baby blanket with the NASA logo on it.

We grabbed our phones and found a few examples of the "space meatball" logo done in cross-stitch, but the only pattern for sale involved signing up for the vendor web site before you could even think about paying, and the credentials were, ah, intrusive and nosy. No, I am not going to tell you my life story just so I can buy one cross-stitch pattern.

So I made my own in a spreadsheet, did some math to figure out how to centre it on a metre square baby blanket, and had at it.

As you can see from the photo above, I did the logo's background in intarsia, but embroidered the white and red details over top. This was simply because the idea of knitting in those far-apart white "stars" did not seem like a good functional design decision. Originally I was going to do the embroidery in duplicate stitch, but that was coming out unevenly and making the fabric too stiff, so I took it all out and switched to cross-stitch.

I like cross-stitch on knitting. The stitches provide good coverage, but the fabric stays flexible because most of the embroidery yarn just sort of floats on top. The only thing to remember is that instead of the square stitches one usually gets, these stitches come out wider and shorter because knitting is wider than it is tall (5:7 ratio for plain stocking stitch as used here). My embroidery chart spreadsheet had to take that into account as well.

The border was 4 rows/stitches of built-in garter stitch (ie: knitted as one piece with the rest of the blanket). I like garter borders, but I have a bad habit of making them too narrow to prevent the edges from rolling/flipping. In this case I gave a blanket a quick stretch/block to settle down the flipping, and added a flannel backing.

The backing was necessary anyhow to cover up the embroidery floats on the back of the blanket, and while it hasn't tamed the edge flipping entirely, it has tamed it to such a large extent I don't think any more adjustments are required. Besides, if it's going to be a "NASA" item, shouldn't it be a little overengineered? 

This was the first time I'd backed any knitting with woven fabric, and it was much easier than I expected. I found a fabulous technical knitting blog which explained all the considerations very well. Everything from cutting to machine sewing the hem to hand-sewing the backing to the blanket took about half a day, and half of that was comfortably sitting on the couch watching TV while I did the hand-sewing part. I used doubled thread for strength, and matched the overcast stitches to the rows/stitches on the blanket — something you can do when your gauge is in the firmish range like mine tends to be.

The knitted part is all 100% acrylic yarn (yeah, I went there), of various brands. The logo itself is all in Red Heart, which is a little thicker than the Lion Brand Pound of Love I used for the main colour. This worked out well because it means that the logo is a little stiffer and "pops" slightly from the background.

The Lion Brand yarn was a great discovery (more advice taken from J-A). It's soft, and the Oxford Grey I used has enough colour depth people thought it was wool. I used a whole ball plus about 20% of another ball for the blanket, and never ran across a single knot — amazing for about a kilometre of yarn.

The finished blanket came out slightly larger than the square metre I had planned (and despite fussy gauge swatching — oh well). I couldn't get a good photo showing the whole thing, but here's an overhead shot from when I was blocking it for context:

context.jpg

211 stitches x 280 rows for 59,080 stitches in total, and all done on straight needles too. And who knows? Maybe the baby will take it to space when they grow up.

daft, artsy & la boca by Katherine Hajer

One of the cool things that happens in my neighbourhood every winter is the Winter Stations installation on the boardwalk. The installations (using the summer lifeguard chairs as bases) are all different every year, and every year they draw big crowds. I just think it's fantastic that people are happy to wander up and down a Canadian lakeside beach in the middle of winter enjoying interactive architecture.

This year there was an extra twist. The local business association decided to hold a Winter Stations shop window contest. Bonnie, the office manager at the Beaches Wellness Centre, had already arranged for a mini-sized lifeguard station to be built, but hadn't decided how to adorn it yet when I showed up for my Saturday appointment. Brainstorming happened with her, chiropractor/owner Johanna, myself, and whoever else was in the waiting room at the time. By the time I left, I had a mission: to yarn bomb the mini-station with interactive knitted faces.

The mouths of the faces have knitted tubes attached to the back, which lead to a knitted bag. The bag is full of treats: candy, coupons, whatever else Bonnie and Jo decide to put in there. The fun part is that people reaching inside can't see what they're going to get.

The sides are relatively open so that people can see from the outside how it all works.

Here's the official artists' statement from the window:

La Boca
Beaches Wellness Centre Winter Station Design 2017
La Boca takes reference from the colourful, vibrant houses of La Boca barrio, a neighbourhood in Buenos Aires, where immigrant migrates from various places landed.
La Boca means "Mouth" in Spanish and invites passersby to explore the secret treasures by putting their hand in the mouth.
This "Winter Station" represents the colours, sensory and hot temperatures of Buenos Aires to warm up the winter of the Beaches in Toronto.
Creative Team:
Katherine Hajer - Textile Artist in Residence
Godfrey Construction - Ed Godfrey/Chief Nail Gun Operator
Bonnie Menard - Curator of receptive spaces
Johanna Carlo - Head Honcho and Ideator

The Creative Team part is the coolest thing about this entire project. It really was a collaboration. I did the knitting, but what I was knitting were ideas from other team members. Bonnie created the environmental space around the installation (and yes folks, that's real sand she hauled down from a local garden centre, and real tree branches forming the "trees" around the station). She also created the "dripping" yarn strands hanging from the ceiling and arranged the balls of leftover yarn on the top of the station, which I like because it looks like the sculpture is forming from the ceiling.

Ed made the lifeguard mini-chair, and Johanna sponsored the whole thing, came up with a lot of the executable ideas (the interactivity, the importance of the mouths, the colour scheme, and the La Boca connection, not to mention the wonderfully over-the-top titles for all of us).

The different shop stations win by being voted on. If you want to vote for this station (you can, once a day until the contest closes!), follow this link and vote for "Beaches Wellness Centre". A randomly-drawn vote will also win a prize from the Beaches BIA!

the knitting

The yarn was picked up the Saturday the whole idea came together, and then for the rest of the day I planned out how I was going to get all the knitting done in a week.

The most obvious way to take care of the big, rectangular facial planes (90x60cm) was with my knitting machine. Problem: I hadn't used my knitting machine since I moved house 8 years ago. One of the table clamps had been lost during the move, and while my stepfather had given me a replacement clamp, its diameter was a little larger than what the knitting machine was built for.

So before anything else was done, I had to take a drill to my knitting machine and gently scrape out one of the table clamp holes until it was big enough to accommodate the replacement clamp. Surprisingly, given my history with power tools, this was achieved in very little time with no damage to knitting machine, drill, furniture, or myself.

Knitting machines distort worked fabric both widthwise and lengthwise, so you have to knit a swatch and then let it rest for 24 hours to let the fabric relax into its final state. The photo at the top of this section shows my swatch, the yarn for the project, and my machine setup. Yes, it takes over the entire dining room table.

Once the swatch had relaxed, I could measure it and determine from its gauge how many stitches and rows I needed to make rectangles the right size. Each rectangle worked out to 90 stitches x 198 rows — thank goodness the machine came with a row counter! Machine knitting is hard on one's shoulders, so I made one rectangle per evening and then stopped for the night.

Wednesday I hand-knitted the orange treats bag, just starting with 8 stitches and working a basic beret shape until it was wide enough, working a few rounds even until it was high enough, then decreasing until the top of the bag matched the size of the mouths I was going to put on the faces.

Thursday and Friday I made the eyes, noses, and mouths. The mouths were measured and then unraveled, then the raw stitches were picked up and knitted for a few rounds to make lips. The mouth tubes were picked up from the wrong side and knitted until they were just over half the depth of the mini-chair.

The eyes got more complicated as I worked on them. At first they were going to be flat, cartoon-animal eyes, but then I remembered that crochet sphere calculator I used to make the Om Nom dolls for the nieces. The final eyes were made from half a white sphere, then part of an iris-coloured sphere, and then finally a flat black circle for the pupils. I didn't want the eyes to be too staring, so I made upper and lower eyelids for them (and yes the upper and lower lids are different shapes). Each eye was lightly stuffed to keep it from being crushed during travel and installation.

The nose, on the other hand, is just a folded triangle shaped to fit the gap between eyes and mouth.

There are a lot of great things about this project — the collaboration, the artists' statement, just the way it all fell together — but mostly I think it's a fabulous example of what happens when everyone pitches in over a short amount of time. It was an intense seven days working on it, but it was only seven days. We all did what we said we were going to do, and the results are exactly what we aimed for.

It was fun the following Saturday to sit in the waiting room and watch people going by on the sidewalk. A lot of people were catching sight of the installation, pausing, taking a good look at it, then glancing surprised at the office storefront sign to figure out what sort of place had such a thing in the window. It will be interesting to see how the reactions evolve over the course of the installation.

random hats by Katherine Hajer

Hats can be great for needlework experiments. You only cast on about half a sweater's worth of stitches, play around with stitches and colours, bring the top to some sort of logical conclusion, and there it is — a hat. They're also great for stash-busting, because you only need to make one of them, and so long as they are in reasonably wearable colours, no-one is too concerned if they don't matchy-match one's coat and gloves perfectly.

Okay, that's true for Canada. Perhaps in more temperate climates people are pickier. Here the prevailing attitude is, "It's warm, it's clean, it fits, it doesn't look too awful and I gotta go out. Done." It's not unusual to see someone otherwise dressed in rather nice business attire sporting a toque in the colours and logo of their kid's hockey team.

The hat at the top of this post is the infamous Shedir pattern Knitty published a few years ago, and which is now part of their free download supporting breast cancer awareness. Shedir was designed as a chemo cap, but it's also a very stretchy design, so it will fit on the head of someone with hair.

I've made Shedir before; an effort that was originally made for me but wound up going to my friend Cathy. My face is too square/round to wear toque-style hats successfully, whereas hers is thinner and looks great in them.

It was fun working through the pattern again. Shedir is an absolute joy to knit, especially if you enjoy Bavarian/"baby" cables. The instructions are flawless and the finishing at the top transforms the mini braided cables of the sides into a nice flat star shape.

I used a stashed ball of Cascade 220 100% superwash wool, but if you are making it as a chemo cap, use the recommended Rowan Calmer. It's smooth, very soft, and super stretchy. It will feel good on a bare scalp not used to being bare, and if they like, the recipient can keep using it as a hat after their hair grows back.

The brown hat with the star colourwork is the Basic Hat pattern from Ravelry, plus a colour chart from the Norwegian Star earflap hat. Both are free patterns, and both happen to have the same stitch multiple, so they go well together (the Basic Hat author recommended the earflap chart). The version I made uses up some more yarn from the nieces' kitties playset. A lot of things are coming back to the kitties playset right now.

The last hat to show, but actually the first I made of these three, is the Windschief-ish hat I made from the same brown yarn as the Basic Hat. This is a beanie with a twisted-rib border, where a quarter of the stitches stay in twisted rib while the rest of the hat switches to stockinette. The ribbed section biases to one side by decreasing before and increasing after the section, until it's time to decrease for the crown. At that point, you decrease before and after the ribbed section, plus at two other equidistant points. Because there are only four decrease points instead of the traditional eight or twelve, you have to decrease every round instead of the usual every other. That means that the "camera iris" effect at the top of the hat shifts twice as fast, and the ever-narrowing ribbed portion swirls around the crown in a pleasing spiral effect.

At least, that's how this hat went. The pattern is for sale, for $6 USD. That's nearly $8 Canadian at the time of this writing, and for a hat I can guess so much about just by looking at photos... I just can't. There's instructions for a cowl included, but the cowl just seems to be the same as the hat, except you never do the crown shaping, and you put a twisted-rib border at the top as well as the bottom. The cowl "fits closely", which tells me it's the same circumference as the hat. I'm actually planning on making another hat and a cowl to match it, just because the pattern seems show off to take variegated yarns well, and I have several hundred grams of variegated to get out of stash.

In the meantime, I found... most of another skein of brown buried in a basket of red and blue yarns I had set aside for the giant stripey blanket. It's actually visible just left of centre in the first photo of that link. I'll have to figure out what to do with it, but I suspect it will be turned into another hat.


poké-woolies by Katherine Hajer

Niece the Elder's birthday is on New Year's Eve, which gives you an idea of how far behind on blogging I am right now.

Ahem. Let's start again.

Niece the Elder's birthday is on New Year's Eve. Besides dooming her to a life of birthdays where there's always a party, it means that she tends to get gifts a little late from me. It's hard to come up with distinctive Yule and birthday gifts when the birthday happens only a week later.

Niece the Younger, meanwhile, is not quite old enough to see her sister get a gift without her getting the same. Her birthday is at the end of March, so I told them I would get them both little gifts for each one's birthday, so they both got things both times.

Right now they are both into all things Pokémon, especially the trading cards. My mum found them some commercially-made Poké knits, and suggested I make them hats and matching mittens.

There are a lot of patterns on-line for Pokémon, of varying degrees of aesthetic success. My hat and mitts are based on this free pattern, though I followed the advice of other people and crocheted the circle motif instead of duplicate stitching it. The other mod I made was to only cast on 80 sts for the hat, instead of the recommended 100 — a lot of posters commented 100 sts was too big for their kids. I got 80 sts by remembering that Elizabeth Zimmermann calculated a hat to be the right size if it were half the circumference of a sweater, and looking up how many stitches at the same gauge I would need to knit the nieces sweaters.

The mittens are the same basic two-needle pattern from a free Paton's leaflet I've been making since I was twelve years old. It's so basic, in fact, that it's very easy to adapt to specific colour patterns, as done here.

Here's Niece the Younger modelling a hat while her big sister attends hockey practice:

I gave them a booster pack of trading cards to go with the knits, plus some lenticular bookmarks with wildlife scenes on them. I think the cards and especially the bookmarks were a bigger hit, but they liked the knits. Niece the Younger pointed out it meant she would always have three Pokéballs on her in case she found some monsters to catch.

The best part (for me) is that the black, silver, and white yarn were already in stash because of the kitties I made them, so I only had to buy the red. So I managed to work some stash-busting in too.

DIY spontaneity by Katherine Hajer

cloche finished.jpg

One of the myriad benefits of being proficient in some sort of DIY is that you always have gifts on hand — they just probably require some assembly.

I recalled that when Tara and I went to some local street festivals over the summer she was looking for a cloche hat. There were plenty of options around — it's a shape that's back in style again — but for something so recognisable, there are infinite variations. 

There are plain cloches, and then there are ones with fantastic spiral sculptures wandering all over the standard cloche shape. There are cloches adorned with ribbons, feathers, silk flowers, sequins. 

I found a free pattern on reliable Knitty, and dug through my stash for suitable yarn that would match Tara's winter coat. My stash being what it is, it did not take much digging. 

(I only blocked the brim because the crown's shaping was good as-is.)

The pattern is one of those ones which seems daunting at the outset (240 sts for a worsted-weight hat, whaaaaat?), but which resolves to a reasonable and easy bit of work in short order. Half of those 240 sts make up the spiral, and they get decreased away to nothing in very few rows. The remaining stitches get decreased by 20% and then form the crown.

I gave the hat the hair-conditioner treatment prior to blocking, since the hat sits low enough to touch the skin at the forehead and back of the neck. This had the added benefit of making the fabric quite a bit more limp than it was during knitting, and flattened out the curl at the cast-on edge. 

I'd like to make this again in different colours. It's super-retro but classic at the same time, with the benefit of being practical for Canadian winters. 


better knitting through chemistry by Katherine Hajer

Several years ago, a group of my knitting friends and I decided we were all going to try out dyeing wool with Kool Aid. None of us had ever tried it before, and it sounded like an easy, fun thing to do. It was my turn to host a knit night, so on the appointed evening I set several large pans of water ready on my stove, and people showed up with Kool Aid, yarn, and snacks.

It was a lot of fun, and a bit scary. By the time the process is completed, the water used to dye the yarn is completely clear again. The yarn gets rinsed after dyeing just to make sure everything is colourfast and... yeah, everything was. The yarn got washed twice afterwards (more on that below), and no dye came out of it at all.

Just regular Kool Aid, water, and some vinegar if I remember right. It really makes me regret all those "juice crystal" drinks and popsicles I had as a kid.

I dyed 100g of Briggs & Little Regal with a large packet of orange Kool Aid, because nothing says "chemistry experiment" than taking a hank of natural yarn spun at a mill that's been around for 150 years, and turning it a soft orange with drink crystals.

The yarn sat in stash for a long time. I was so eager to see what the dyeing would do to the wool that I didn't think about what I was going to knit with it. I finally decided to make Cathy a hat and a pair of mittens for Yule.

The hat and mittens pattern both come from The Shape of Knitting, the Tilda hat and the Mer mittens respectively. The hat reminded me of a whale's tail for some reason, and the Mer mittens' cuffs have a ripple based on those of sea anemones.

They're both great designs for the knitting and for wearability. The hat is like a slouch hat, but without the excess fabric those usually have. Instead, it curves over the crown of the head while leaving the underside with just enough fabric to meet up gracefully. The joining-up of the front and back involves some fun 3D shaping which is not too hard to work so long as you put faith in the instructions.

The Mer mittens are mostly double knitted. Why do more knitting patterns not take advantage of this technique? It makes things so much more comfortable and easy to knit. The mittens were also the first time I used the technique the book's author calls a speed increase, and it's a great one to add to the general repetoire. A knitter can use the increase to easily double the number of stitches for an entire row or part of a row, quickly and with no stitch distortion. I like how the cuff ruffle gives them a little bit of flare without being ridiculous or overly girly. I also like how the ruffle is only on the back of the mitten, so it won't get in the way.

I love Regal yarn for its minimal processing, but sometimes people find it scratchy (feh!). Therefore, I found this project a good excuse to try some more home chemistry. After washing the finished items in Soak, I worked a generous amount of hair conditioner into them and let them sit for several minutes. Then I rinsed out the hair conditioner and let things air dry on a rack per usual.

Wool haters will still find them scratchy, but they really are much softer than they were before. It was definitely worth using the hair conditioner! I did notice the ribbing of the hat had a more "limp" hand than it did before, but since the rib is for fabric design (it keeps the short rows and the finishing neat) and not stretchiness, that works. The mittens are more flexible now, which is a bonus.

kitties! by Katherine Hajer

As with any human endeavour, there's a certain amount of misconceptions and just plain head-messing with needlework. Non-DIYers will often assume you are a) poor and b) trying to save money, whereas in truth making things by hand is often at least as expensive as buying ready-made (though of course with the bonuses that you have far more control over factors like colours, sizes, and fibre content).

Crafters play head games with themselves too. I have a bad habit of under-estimating projects which require making lots of small things. Sure, each small thing may be very quick to work up, but the finishing can equal or surpass the work necessary for a much larger thing.

The nieces requested me to knit them kitties back in mid-October. Niece the Younger wanted blue, Niece the Elder grey with a black face. The kitties also had to stand up on their own and have toy mice to play with. Got that? The kitties needed toys.

The kitties. Uh huh.

Fortunately, I like to keep track of what knitting books have been published for just such occasions, and knew that Osborne and Muir of Princess Diana sheep jumper fame had written a book called Knit Your Own Cat (among many other books). Both the blue cat and the Siamese (they didn't have the right shades of grey and black at the yarn shop, so I made do) are knitted from the British Shorthair pattern, which was the most, er, "catlike" of all the cat patterns. The rest of the patterns tended to give the cats very narrow bodies and pointed faces, which made them look rather rodent-like.

I did originally intend to also make the nieces Bengal cats in their preferred colours, but once I'd stuffed the first one I realised I didn't like the body proportions. Do you see what I mean? The hind legs are too thick, the forelegs too thin, the neck is too long, and although I did mod the head a little so it would be looking straight ahead instead of down like the original, it's just not right. To me it looks more like a bird's head. It's lovely shaping and all, but it's just not a cat.

Someday I will borrow the book from the library again and plot out the fur pattern on a graph, so that I can expand it and make it to cover the shape of the British Shorthair. I just ran out of time.

In the meantime, I knit the kitties some mice from this great (and free!) 20 Minute Mouse pattern, and crocheted each of the kitties a bed, a dangle toy, some collars, and a food bowl. I also got some Goldfish crackers for the food bowl because, let's face it, those things look like pet kibble to begin with.

The collars were made last, and were finished around midnight Christmas Eve. Like everything else for this project, they weren't difficult, but they were fussy. Foundation single crochet for the collar strap. A single star or moon (circle) medallion. Then sewing the strap together and sewing the medallion to the strap, burying four separate ends into a finished piece made up of not-very-many stitches. It was all very fiddly, as was everything else in the play set. Altogether there are two finished cats, two beds, two food bowls, two dangle toys, four toy mice, and eight collars. It all took much longer than expected.

Niece the Elder has already named her Siamese Fluffball. Niece the Younger's kitty went through several names Christmas afternoon, ranging from Fluff to Fartball. We'll have to see what she settles on.

spirals, stretch, physics by Katherine Hajer

Niece the Elder requested a thin, warm hat to wear under her hockey helmet, so I headed to the internet and found this free Swirl Hat pattern by Mandie Harrington.

This is one of those great free patterns one finds sometimes. The directions are written for a wide range of sizes, from preemie to adult. The writing-up is very clear, and includes colour coding so you can easily keep track of the numbers for the size you are making. I'm not surprised at all that as of this blog post the pattern is available in eight different languages. In itself it's a great example of the internet glomming onto a truly cool thing someone's done and running with it.

The spiral rib design means that the fabric will stretch comfortably to fit lots of different heads. When I was making it I kept calling it the "Jiffy Pop" hat — the swirl is similar to the aluminum foil top of the Jiffy Pop pan before the popcorn puffs it out. I like that it was written for fingering weight yarn instead of the usual worsted or chunky — not everyone wants or needs a thick hat for all winter occasions! The nieces do play a lot outside during the winter, but they also spend a lot of time sitting in cars in full winter gear. It makes sense for them to have thinner hats for when they might be cold but not necessarily braving the elements.

This hat is a great example of a project that is fun to knit up, but also very quick. The regular rib at the lower border bothered me more than usual. Nothing to do with the pattern — I just wasn't into it. The first few rounds of the spiral rib were confusing, but once I learned how to read the fabric it was very easy to do. The rhythm's a little different from the sorts of texture and lace I'm used to. One thing to watch out for: the spiral lace means that the start of round is not obvious after the work gains some height. As always, I'm reluctant to use stitch markers, so I noted where the yarn tail from the cast-on was, and traced that rib up to where I was working to determine where I was in the actual round. I was using dpns instead of a circular needle anyhow, so I had a backup indicator.

The top of the hat is completed via a stitch pattern modification which decreases the stitches over several rounds, bringing the hat's swirl to a graceful close with a flat, non-lumpy finish.

The bubblegum pink sock yarn was originally bought as embroidery yarn for the Hello Kitty-style boot cuffs I made Niece the Elder back in 2012. That only took a miniscule amount, so most of the skein has been sitting in my stash ever since, making me wonder what on earth I was going to make with bubblegum pink sock yarn. Turns out the remainder of the 100g ball will make at least two, possibly three hats. The nieces are prone to lose hats, so I'm going to keep making bubblegum pink ones until I run out of yarn.

cowl crazy by Katherine Hajer

I got an interesting knitting book from Book City a while ago called The Shape of Knitting. At the time I thought, okay, this could be good for stash-busting, and then I put it on my shelf and sort of forgot about it.

Something clicked a couple of weeks ago, and it came down from the shelf. This time I pulled several different balls of orphaned chunky-weight skeins of yarn from my stash and tried out this cowl pattern.

Here's the cowl laid flat and without its buttons sewn on yet, making a lovely scimitar shape:

If you know anything about knit or crochet, but don't know the pattern or book themselves, you might still make an educated guess as to its construction. Start one of the buttonhole tabs, join new yarn for a few rows to make the vertical buttonhole, then merge the halves. Make a second buttonhole tab the same way, then knit across the two. Make the cable twist, which is several rows high and overlays the other half of the cowl, so... oops, must need to start and stop the yarn a few times in there too, right?

Nope. The entire thing, dear reader, is made in one continuous piece. There is one tail from the initial cast-on, and one from the final cast-off, and that is it. Sew on the buttons (which go in nice logical places, so are not hard to locate), and you are done.

Plus 85% of it is done on 9mm needles. Each one takes maybe three and a half hours to make, especially once you get comfortable with the tabs/cable part. Is it any surprise I made four of the things?

The two shown above went to my chiropractor and her office manager as Yule gifts. The one below (and another one I didn't photograph) got donated to charity. Mostly I had to make myself stop because the button costs were starting to add up.

But if you can lay your hands on the book and have about 120m of chunky-weight yarn handy, I strongly recommend this pattern. It's quick, it's unorthodox, it's fashionable, and it's fun.

the stash-busting power of entrelac by Katherine Hajer

Entrelac has long had a reputation as a stash-buster. Gather up some yarn in complementary colours and the same weight, have at it, and come out the other side with a Harlequin-style sweater. Nothing easier, right?

I've been trying to make myself something in entrelac since high school and never come up with anything. Never.

What's up with that? For one, I'm usually trying to work without a pattern, and never seem to make a gauge swatch big enough to calculate sweater circumference correctly. Entrelac tilts the stitches on their sides, which means entrelac doesn't fit into one's preconceived notions of rows and stitches.

For another, I think I've always been overly ambitious in my entrelac experiments.

I had some fun over the holidays, just randomly pulling yarn out of the stash and turning into useful things without much worry about who it was for or what size it was supposed to be (so long as it would reasonably fit a wide variety of human beings). Mostly I followed patterns from my own books, but I did get a book out of the library on entrelac and made a few things from it. The one lonely ball of worsted-weight Noro I've had lying around for years got turned into a hat with an entrelac circle at its top (top photo). It was fun watching the yarn's long runs of colour work within the pattern.

The hat fit my head, but was a little too stretched-out to be attractive. It would work well for a child — or just someone smaller-framed than I am.

I also made a jabot-style scarf out of some odd balls of Rowan Calmer. The end triangles are entrelac, and then the scarf is just a ribbon of ribbed fabric connecting the two together.

It'll make a nice light-but-snug scarf for someone. The ribbed entrelac and scarf body have a extra benefit that they look good from both sides of the fabric. I hate scarves that have a right and wrong side.

This "just small wearable things" challenge is turning out to be fun! I can play around with shape and colour, but still finish quickly. It also means I don't have to spend a lot of time sorting through stash to amass a colourway with enough yardage to make anything big. Small and quick wins the stash-busting race.

busted! by Katherine Hajer

2016-11-14 11.31.02.jpg

Stash busting gets interesting when you have a limited amount of textured yarn. In this case, I had exactly enough lavender bouclé yarn to make this child's jacket (size 8-ish).

The yarn is chunky and the needles were 8mm, so the knitting was mostly straightforward. Because bouclé lacks stitch definition (duh), I tended to only work on it when I knew I could have a good session of it and wouldn't have to make detailed "where was I again?" notes.

Alteration: the only I changed (besides not using the called-for smooth yarn) was to add a narrow garter-stitch edge to the fronts instead of adding a row of single crochet during finishing. And, um, I'm pretty sure I changed the collar too, but at that point I was trying to get the thing done with the yarn I had left and not following the pattern so much. 

In the end I had a ball of yarn the size of a tennis ball, which of course at this thickness yarn is not a lot.  

The original pattern called for the jacket to be closed with a kilt pin. Yeahhhh, giving a kid a giant sharp pin is maybe not such a good idea in today's parenting climate. Instead I improvised an I-cord button and frog closure, which should please most health-and-safety concerns. Besides, it used up a few more metres of that stash white acrylic worsted I can never quite free myself of. 

I was going to donate the jacket to a charity shop, because the nieces are just growing out of this size (and I'm not sure they'd like it anyhow) but then Bonnie at Beaches Wellness Centre said her niece would like it. Works for me!  I have many, many items slated for making and donating in the near- to mid-future. 

Overall I'd say this counts as a positive stash-busting experience. Just as well, because I have the same amount of white bouclé with which to make another jacket!