design

easy vs. hard by Katherine Hajer

This is one of those good news/bad news/good news stories.

The good news is that I calculated how much yarn I would need for the nieces' Yule superhero sweaters, ordered it from Mary Maxim, and received it in the mail. I don't know why it's so hard to find machine washable DK yarn suitable for kids' things in walk-in shops, but it is, so mail order is the way to go. This is Maxim's own-brand Ultra Mellowspun — it's synthetic, but it's soft, durable, and comes in lots of colours.

The yarn arrived just as I was finishing up (I thought) the cotton t-shirt that's been aggravating me all summer. I thought I just had to graft the fronts closed and sew the body onto the yoke when this happened:

Those are the two sets of stitches to be grafted, and as you can see, there are a lot more stitches on the bottom needle than on the top one.

At first I thought there might be a mistake in the pattern, because I've been counting my rows obsessively, but this morning I figured it out.

In my little corner of knitting, when a pattern wants to tell you to increase every row at one end, it says something like, "Inc every row at neck edge, 8 sts from edge of work for 24 rows." Get it? The increasing is happening every row, both right side and wrong side, it's only happening at the neck edge, and it's happening eight stitches in from the actual edge of the fabric. Also you need to do it 24 times total

Instead, the instructions said:

Inc row (WS): Purl to m, sl m, p2, M1P
Inc row (RS): K to 2 sts before m, inc 1, k2, sl m, k to end
Rep last 2 rows 11 more times.

I know they boil down to the same thing, but it's the extra atomisation of the instructions, plus not stating the full number of repeats ("11 more time" as opposed to "12 times total") that throws me off. I've made the same mistake already on this same pattern.

To fix this, I'm going to have to rip back to where I stopped the increasing prematurely (30 rows) and work up again. Meanwhile, I've already tried to do the grafting, so I have to make sure the raw stitches from the provisional cast on stay safe. Also there is the drop-stitch lace right in the middle of all the shaping to contend with.

I am not happy. This was supposed to be an "easy summer knit", and the dumbed-down instructions are driving me crazy.

Given that the summer is practically over and that Yule yarn has arrived, I decided to start Niece the Elder's Wonder Woman sweater from the free pattern I found on Ravelry. The original pattern is in adult sizes and uses worsted weight yarn held doubled. I'm making it in DK yarn to a child's size 8. According to my math, if I follow the largest size in the instructions and use the recommended needle size on the DK yarn ball band (4mm), I'll get a size 8 sweater:

And what do you know? It's working out exactly to size. What's in the photo only took me two days to do as well. Before anyone says, "kid's sweaters go faster", remember, I'm using the exact same stitch counts as for an adult's size large, just on smaller needles with thinner yarn.

It's been a nice reassurance that I can knit something correctly, so long as it's difficult enough!


rapid prototyping by Katherine Hajer

Toronto is in the middle of the annual "deep freeze" part of the winter — where air masses migrate south from the Arctic and make the local temperature very cold. We've been in the -10C to -15C range for a week, with the wind chill making it feel more like -30C. It's finally warmed up to around 0C today.

But that got me thinking of slippers. My hairdresser has a basket of slippers by the salon entrance so people can remove their wet, slush-covered boots at the door and wear a pair of dry, comfy slippers while they're getting their hair done. I mentioned it to my chiropractor, since her office has hardwood flooring, and proposed I make some slippers out of leftover yarn for the waiting room.

The criteria:

  • Use stash yarn only (so I clear more stuff out of my apartment — there's my selfish motivation in all this)
  • Unisex styles and colours
  • Durable (long lifecycle — I wanted to make them and then not have to worry about making replacements for a long time)
  • Machine washable
  • Last but not least, they had to appeal to people who are not necessarily into the whole "handmade" aesthetic. I didn't want anything that gave a first impression of, "ooh, saw something like that at a charity sale once. It was really ugly."

There are lots of slipper patterns around. Remarkably few of them meet the criteria, especially that last one. And while usually I'm all for vintage, a lot of these patterns were good reminders that not everything about the 1950s and 60s was chic and elegant.

My first attempt were some "ballet flat slippers" that came out looking like Archie Bunker's grandmother made them as something for someone to wear as punishment. Partly it was the colour scheme I chose, partly the textured stitches (which leave big holes between rows when worn).

Also, even though the slippers were entirely crocheted, they didn't feel very substantial. I could see the soles wearing out very quickly.

Bottom line was, I just didn't like them. So they got ripped out, and I went pattern hunting some more.

Eventually I found a pattern for crocheted loafers with two-layered soles and parts of their construction modelled after shoe-making. I thought the results were acceptable:

I like how the inner sole colour peeks out just below the upper. The pattern came in a wide range of sizes, and the results are shoe-like enough to calm everyone but the most pro-factory slipper-wearers.

Being crocheted, the yarn consumption is relatively high for the results. That's fine for the soles, which need the fabric density anyhow, but I wondered if there were other options for the uppers. I tried making a basic "kimono" upper, and was pleased with the results.

Funny thing: the inner sole and the stitching holding the two soles and the upper together are recovered yarn from those ugly slippers I started with. These got worked on in public a bit, and I got some nice compliments on the colour combination. Maybe it was the pattern all along, or maybe adding the red helps.

The nice thing about the knitted upper is that it's just a plain rectangle, and only about twenty rows high, including the border. Although I think this prototype worked, next time I make slippers like these (um, next Tuesday night, most likely), I'm going to make the uppers about four rows higher so that the overlap at the front is more pronounced and so that there is slightly more coverage at the back of the heel.

I made the knitted upper so that the stitch gauge was approximately the same as the stitch gauge on the crocheted soles. That way, when I was slip stitching everything together, I could count on matching one knit stitch to one inner sole stitch to one outer sole stitch. There was a little bit of easing when I got to the toe, but not much.

The completion of the first pair of kimono slippers led me back to loafers. In the original pattern, you are supposed to make the top part of the toe box as a separate piece and then slip stitch it to the upper, easing to fit. It felt awkward to do, and was a little tricky since the toe doesn't actually fit in place.

On my next pair of loafers, I experimented, working U-shaped rows and matching decreases to the increases used while making the soles. It took two tries, but I was able to finish the toe box without breaking the yarn. I think I'm going to make all the loafer-style slippers this way from now on:

In the meantime, while I was making all of these, it occurred to me that it would be good to provide a basket to put them all in. So I found a pattern on-line, grabbed four mismatched skeins of white acrylic yarn from my stash, and had at it. In about two and a half hours, I had crocheted as far as I could with the four skeins without running out of yarn:

Now I just have to make enough slippers to fill the basket!

aswirl in spreadsheets by Katherine Hajer

I tried making a swirl jacket last autumn, and summed up my problems with the directions/sizing and decision to rip it all out in a blog post. This past week I've been off whilst recovering from surgery, so I decided to finish unravelling the work, make a new gauge swatch (more on that below), and sit down with the pattern book and a spreadsheet.

What I learned has put me off making any sort of swirl from the yarn I had set aside for it. The reasons why mostly have to do with what I found out from my spreadsheet, but also some "helper" information I found on the author's web site. My main take-away is that it would be very difficult to get predictable results if one went by the book alone. I would go so far as to say that making any adjustments for fit at all would require a virtual redesign without the information on the web site.

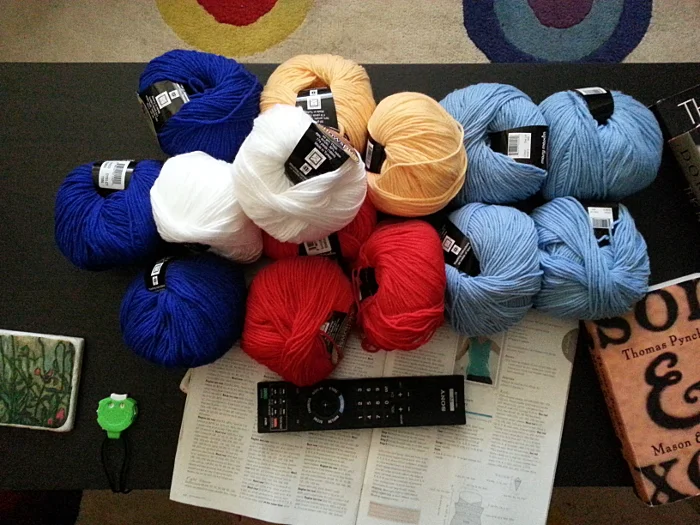
I didn't like the fabric hand of the original swirl jacket, so decided to go up to 5.5mm needles to get less springy fabric. The gauge swatch in the photo above is 50 stitches wide by 50 rows high. As you can see, the welted fabric (used on every pattern in the book) makes a horizontal rib. Horizontal ribs are pretty much the same width as a similar piece of stocking stitch, but their length/row gauge is going to change drastically depending on whether the fabric is unstretched, slightly stretched, or as stretched as it can be without distorting the stitches. I couldn't find anywhere in the book which actually says how much you're supposed to stretch the fabric to measure row gauge (there is an explainer on the web site since "knitters" were having trouble with it). In the book there is a lot of detail about making a larger-than-normal swatch, washing and blocking it, etc. etc., but never how to actually measure the thing. That seems like a weird omission for a ribbed fabric. Usually an author will at least put in the standard "slightly stretched" directive.

I took one stitch measurement and three row measurements based on different amounts of stretch applied (without reducing stitch width), and got for 10cm/4":

  • 18 stitches
  • 25 rows when pulled out to "maximum" (matches stocking stitch row height without distorting the stitch width)
  • 30 rows slightly pulled out
  • 45 rows fully scrunched (not pulled out at all)

Large, horizontally-draping parts of the jacket, like the lower back, will stretch from their own weight. Vertically-oriented parts, like the collar lapels, will hardly stretch at all. A big fitting issue I had with the original jacket I made was that while the back and shoulders fit well, the fronts could not be closed except by stretching the fronts to their maxium — not very flattering! It seems telling that most sizing photos show the jackets with the fronts open. If I'm going to make a large, A-line jacket, I want to know it can close. I know plus-sized people are supposed to resign themselves to cold stomachs and chests to look flattering, but I refuse when it comes to custom-made clothing. Especially clothing that claims to flatter a large variety of body types.

Okay, I had my gauge swatch — now what? I went through the pattern book, noting all of the patterns which had a similar gauge, their shape category, and the few measurements provided (just for my yoke size, size 3). The list included:

  • Winter Waves (Centred Circle)
  • Tangerine Rose (Centred Circle)
  • Silken Dreams (Off-centre Circle)
  • Strata Sphere (Off-centre Circle)
  • Shades of Grey (Off-centre Circle)
  • Plum Perfect (Off-centre Circle)
  • Wild Thyme (Off-centre Oval)
  • Coat of Many Colours (Off-centre Oval)
  • Silhouette in the Sun (Off-centre Oval)

Note that none of the Centred Oval patterns were even close to the gauge swatch, because they were all made with much thinner yarns.

Now that I had the required gauge and measurements in a spreadsheet, I started calculating the other measurements I wanted to consider, using the following assumptions/calculations:

  • the cross-back measurement: width of the non-collar stitches right before sleeve/upper back shaping began
  • armhole depth: the number of rows from the first sleeve increase to the welt at the top of the sleeve
  • body circumference: The cross-back measurement plus 2x the row depth of the fronts up to the sleeve/upper back shaping. Because the fronts/lapels hang vertically and therefore are stretched by their own weight less, I did this twice — once assuming slight stretch, and once assuming no stretch.

If my numbers are right, the swirls all seem to top out with an effective body circumference of 44 inches. That explains why the vast majority of photos of plus-sized people wearing them on Ravelry have them open, with the sides hanging well away from centre front.

For my own measurements, that means if the fabric has a loose enough hand, I'll just be able to find a swirl I can close, so long as I stick to shapes with more generous fronts. Therefore I focused on the Off-centre Ovals, since they have wider fronts.

Problem is, the book also says they have "more fitted torsos" and "slim, tapered sleeves". Okay, sleeves are easy to alter, but I wasn't sure what the "torso" part meant. The upper back, which is the only part that has any shaping? My spreadsheet was showing the smallest armhole depth to be a still-generous 14.1", so I really wasn't sure what this meant besides "not dolman sleeves".

And then I read this note on the web site about how gauge and fabric hand work together in a swirl. The 100% wool yarn I had set aside for the project was only useful for two jackets out of the entire book. Sure, I'd noticed there was a lot of cashmere and silk listed in the book, but I'd just shrugged it off — lots of books use luxury fibres in their samples. They photograph beautifully, and suppliers will donate them for the promotion the book will provide. I've made lots of natural-fibre sweaters which cost less than even one skein of a luxury-fibre yarn, though. I can almost justify a silk blend to myself, just because it's so hard-wearing, but cashmere? Nah. There were some mohair and alpaca blends listed as well, which can be more reasonable in cost, but still. This jacket was supposed to be a stash-busting project, not an excuse to get sticker shock over exotic yarn.

This time the silk and cashmere matter, because they're less stretchy than wool. Despite the welted fabric, the idea is to create a fabric that will stretch out and stay that way. Lesson learned: the welts are to:

  1. create a reversible fabric so things like lapel fold depth can remain vague
  2. create extra stretch in certain parts of the jacket (sleeve cross-measurements, those pesky fronts) to justify the hand-waving about "flattering a wide variety of body sizes".

Of the two patterns which were designed with 100% wool in mind, only one was an off-centre oval (Coat of Many Colours), and its gauge was two stitches per 10cm/4" smaller than my swatch: 20 stitches instead of my 18.

Okay, I'd already made a spreadsheet 19 columns wide; may as well see if I could follow a smaller size's directions and get the size I wanted. It's a common adjustment method, and one I've used many times before.

I entered the stitch counts for the longest sides of the body into my spreadsheet, then the goal measurement in inches I needed below that. Then I calculated out how many inches I'd get at 18 stitches to the inch, with the goal of seeing if any numbers in the smaller sizes matched what I needed in size 3.

What I found was a surprise: the size 3 numbers already matched. I figured I must have made a mistake, so I ran another row of the same calculations, using the pattern 20 stitches to 10cm/4". This is what I got.

(All measurements are in inches since that was all that was what was given on the book schematic):

The numbers in the top three rows, in red, come from the book. The first row is how many stitches to cast on for the long side for each size (1, 2, 3). The second row is how many inches the side should be per the schematic, and the third row is how wide the mitre point strip should be (this is the same number of stitches for each size, so never changes). Each side of the body shape starts and ends exactly halfway through a mitre point strip, so the full width of the long side is really:

  • long side length + (one-half left-hand mitre strip + one-half the right-hand mitre strip)

Add one mitre strip to the schematic long side length, and that tells me the length of fabric that should be between section markers. That's the fourth row, labelled "total side width".

Next, I calculated how big the section would be if I just cast on the prescribed number of stitches at the same gauge I got in my swatch. That's the row labelled "18", for 18 stitches per 10cm/4". The row below with the blue text shows the difference between my gauge calculation and the book-prescribed length. They're awfully close — it would be hard to alter to fix a .1" difference at this gauge, in a stretchy fabric like this. Even the .4" of the size 1 calculation isn't that far off.

But wait. This is the calculation from my gauge swatch, which is off from the prescribed gauge by two stitches!

So I did the same calculations over again, using the prescribed gauge (the last two rows in the spreadsheet). Unless I'm making a mistake somewhere, the prescribed gauge cannot make the prescribed measurements. The book is inaccurate with itself. I would be better off working with my bigger-needled, looser gauge swatch than what the book itself recommends.

Given that the prescribed gauge is off by about 2.5" for each size, and given that the mitre strips are 1.25", it seems the gauge was calculated from a finished garment without the mitre strips being included in the measurements. And given that there are 8 mitre strips accounting for a total of 10" of the total circumference of the jacket, that's kind of scary.

At this point, I checked for the errata. This pattern has had different errata for every single one of the four printings the book has had to date (I have a third printing). None of them mention the gauge discrepancy. To me, that raises the possibility that some of the printed errata are fixes for shaping or other structural issues raised by the gauge being off from the pattern. And the way the construction works on swirls, a knitter could be well into the pattern before they realise something is horribly wrong and they have to rip out several rows and do some of their own calculations.

As it stands, I've done more calculations for my swirl jacket than I have for sweaters I've designed myself from scratch, and still there are a lot of unknowns which I'd like to have settled before I started knitting. Like the sleeve shaping. I would have to add about four more columns to my spreadsheet to get the sleeve numbers I'd want before proceeding.

And this is the part where I give up, at least for now. Near as I can figure, swirls work because:

  • Fit is only guaranteed around the yoke/upper bodice — anything else is handwaved with marketing words like "softly", "tapered", and "gently".
  • Because it fits around the yoke, an area where wearers will notice binding or other discomfort, the jackets are seen as "fitting" when they don't actually fit in other areas. I've looked at hundreds of photos of swirls now. There's a lot of photos with cuffed-up sleeves (and I didn't even get to sleeves in this post) and fronts which are worn open because they cannot close comfortably. Swirls get around this by having cutaway-shaped fronts, which encourages people to wear them open.
  • Because the fronts aren't pulled closed, the back drapes over the hips more generously than it normally would. There are a lot of photos where the wearers imitate poses from the book and are photographed from the back, holding up the fronts to show the swirliness of the fabric colour changes. Which is very cool, but no-one walks around holding up the fronts of the jacket.

Someday, I will be in a shop with a great sale on, and I will snag a "sweater's worth" of some handpainted stuff with silk in it because I can't resist the bargain. I will get home, set it out on the coffee table, admire it, and then kick myself because I have no idea what to do with it. Then this book will come to mind, and I will realise it is Time to Make a Swirl.

But it is not this day.

Now, that raises a question. When making the original swirl jacket, I only had to break the yarn once, after the neck divide on the sleeves. The smaller bit of yarn I used for my gauge swatch for this exercise. The larger ball of yarn is about the size of a basketball, because I spit-spliced throughout.  What to do with it?

Something that doesn't mean I have to use a spreadsheet to fill in missing measurements and double-check prescribed gauges. Something that suits the 100% classic worsted wool (it's even called Classic Wool), and works with its many wonderful properties.

Something that makes me happy.