#craftblogclub

upcycling challenge completed by Katherine Hajer

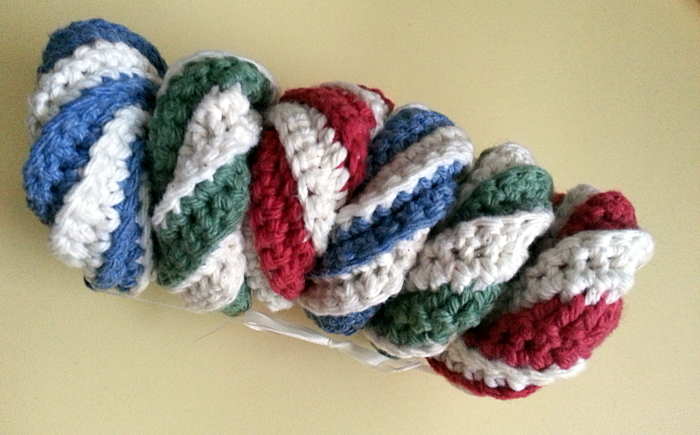
#craftblogclub held its 2016 upcycle challenge over the summer, which was a great prompt for me to dig out the "yarn" I'd made from a worn-out set of bedsheets a while ago. I already blogged about the large basket I'd made, but by the time I was done I still had most of one ball/sheet left.

Around the same time I finished the basket, I found this old Guardian article about how to crochet apple jackets. I know the common wisdom is to never read the comments, but the sheer vitriol of the comments on the apple jacket article was wonderful in an awful sort of way. Who says crafting is boring? Besides, a few commenters explained the article was wrong; these are not apple "cozies" but rather a reusable way to keep fruit from getting gouged or bruised as it travels in your purse or carryall. So as fey as they seem, they really are practical!

Be that as it may, it occurred to me that if the apple jacket idea was scaled up — by using upcycled bedsheet yarn instead of the called-for DK cotton, for example — the shape would be very close to the ceramic yarn bowl my friend Cathy gave me.

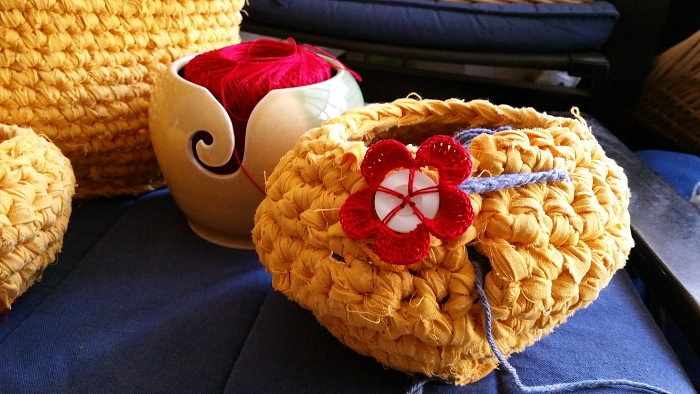
I have been using that yarn bowl nearly non-stop since it arrived. It is perfect for using with odd-balls, ensuring they don't migrate all over the floor in the course of their being worked. It seems to keep centre-pull skeins in better order as well.

The only drawback is that, being ceramic, the yarn bowl is not really meant for travel. The crocheted versions are more amenable to being tossed in a bag to be brought along for knit night.

The crocheted flower-buttons were added just because I've been meaning to try that out for ages, and for fun. Nothing wrong with using a plain button or a different type of closure, of course.

The smaller basket is smaller simply because I was running out of yarn. Its bottom is made from the very last few metres of bedsheet yarn left over from the doily rug I made a couple of years ago.

All three baskets were crocheted with a bamboo 10mm hook, held knife style instead of my usual pencil style. I read somewhere just before I started these that the knife style is much more comfortable for doing this sort of bulky, densely-gauged work, and although I am a dedicated penciller most of the time, I have to say it really did keep my hands and shoulders from getting too tired too quickly.

The fabric has to be worked rather tightly to make it self-supporting. The strips I used were about 2cm wide, but when worked they get folded up so they are more like 5mm wide.

Next challenge: making a new glove/hat/scarf set before the snow flies!

knitted bargello by Katherine Hajer

upload.jpg

Canvas needlepoint was the first craft I ever learned, but I really haven't done any since my early teens. Those paint-by-numbers canvases done in tent stitch would probably go well with mid-century modern furniture, but my favourites have always been the long smooth stitches that spanned multiple squares of canvas. Brick stitch, say, or a Florentine flame stitch. Or go full rococo with bargello, tilting that mid-century look from the fifties to the sixties. 

It so turns out that a knitter much cleverer than I has figured out how to get a bargello-type effect from knitted stripes. Xandy Peters calls her pattern Fox Paws because the tight crests of colour look like little paws reaching across the fabric. It makes a wonderful flame stitch, and does some interesting things with stacked increases and decreases that I've never seen before. 

The yarn I'm using is from an old project I started about sixteen (!) years ago, and never got more than a few centimetres done on. All of the yarn is Butterfly mercerised cotton, which comes in wonderful colours and is great to work with... but maybe not for this pattern. Something with a little stretch, like wool obviously, would be much better. 

Still, I like how the different stripe sections are coming out. 

Do take a look at the project gallery on Ravelry. It's amazing how different such a distinctive pattern looks in different colour combinations and in different garment types.  

#craftblogclub spring gift swap: oodles of cool cards! by Katherine Hajer

Yesterday I blogged about what I sent Zoe in Beckenham as part of the #craftblogclub spring clean gift swap. Today I want to show the lovely cute cards she made and sent to me:

upload.png

Each motif is made up of one or more pieces of fabric, which have been very carefully cut out and glued to the cards. The precison on these is what really pulls them off. The cards are, conveniently, left blank inside, which is what I prefer. And, it just so happens, they are all in my favourite colour scheme too! 

Zoe thoughtfully included matching envelopes, so I don't have to worry about finding some in the right size when I use them. I actually collect cool greeting cards so I always have a selecting on hand when one is needed, so this is a much-appreciated gift!

She also wrote up a very clear, detailed tutorial on her blog. Do go take a look if you want to see more photos and learn how to make your own. 

#craftblogclub spring gift swap! by Katherine Hajer

The spring challenge for CraftBlogClub was to make thing for a gift swap, using only materials one already had on hand. Having materials on hand was not an issue for me [glances guiltily around the apartment at all the yarn]. Katie Gets Crafty organised us into swap pairs, and Zoe Roberts at Oodlesofcraft was my swap partner.

Zoe lists sewing, knitting, jewelry making, and card making as her crafts of choice on her blog, so I thought it best not to do any of those. I stuck with crochet, which seems to be my main method of using up yarn these days. Since I didn't want to make any assumption about what Zoe liked and get it wrong, I made a few small things, in the hopes that one of them would suit her:

Hairpin lace scarf:

This is more or less the same as the one I made a few months ago, except in three colours instead of one. This time around, I wasn't sure I had enough of one colour to make an entire scarf, so I went with long, vertical strips joined by a contrasting trim. As before, each strip of hairpin lace is 300 loops each side. The edging is sc, ch 1 to give it some weight without being too rigid.

Tawashi

I found out about these from Pinterest recently. By definition, they're small, crocheted or knitted items you can use for scrubbing dishes. The swirled stripes pattern I made is very popular, but there are also ones in the shapes of leaves, rectangles, cartoon characters... they're sort of like practical amigurumi. There are lots of different free patterns floating around for these, but I think this is the one I wound up using.

Tawashi are supposed to be made in cheap acrylic so that they can withstand the rigours of pot-scrubbing, but they're so small and cute I thought they might be nicer for washing one's face. I made them in dishcloth cotton so they could be used either way.

Coasters

Crocheted coasters seem to be having a moment. The day I got the ribbon and other packaging materials for the gift swap, I found some commercially-made ones for sale, and patterns for them seem to be proliferating. Summer's practically here, so I decided to make a set of four for the gift swap as well — the night before I had to mail everything off to make the deadline (oops). They were definitely a last-moment decision, but I made all four in one sitting (2-3 Doctor Who episodes watched on Netflix). They're made from the same dishcloth cotton as I made the tawashi from, and flattened out more after I took these photos. The pin I got the photo from leads to here, but the subsequent link seems to be dead — Etsy just displays a lot of "similar items" which aren't similar at all! I just had a good squint at the photo and figured out a facsimile from there. The pattern as I made it is after the photo:

Four stitch tr cluster: *yo, insert hook in next space, pull up a loop, yo, pull through two loops, repeat from * three more times (5 loops on hook in total), yo, pull through all 5 loops, chain 1 to secure. (US four stitch dc cluster)

round 1: chain 6. Join with slip stitch to form a ring.
round 2: 12 sc in round. Join with slip stitch.
round 3: chain four, *tr (US dc) in next stitch, chain two, repeat from * to end, join to original chain four with a slip stitch.
round 4: chain 2, * make one four stitch tr cluster, chain 2, repeat from * to end, join with slip stitch.
round 5: chain 3, *make one four stitch tr cluster, chain one, tr, chain one, repeat from * to end, join with slip stitch. Change to contrast colour if desired.
round 6: chain 1, 2sc in each chain 1 space and one sc over each stitch of previous round. Join with a slip stitch.
round 7: chain 1, sc 2, inc in next st, *sc 5, inc in next st, rep from * around, end with sc 3. Inc should be placed on top of row 5's cluster stitches. Finish off.

#craftblogclub challenge: hairpin lace by Katherine Hajer

This month's challenge for #craftblogclub was to try out something new. I'd recently found all the pieces to my hairpin lace loom again (long story), and since I'd never actually made anything from hairpin lace, I thought it was about time that I did.

I pulled out some vintage 80s yarn from my stash — some Scheepjeswol Voluma I'd picked up at a fundraising sale for the Textile Museum of Canada — and started making loops. I guesstimated that three metres of loops would make a two-metre-long scarf.

That worked out to 600 loops per strip (300 to a side). This is hairpin lace at its most soothing, yet most unrewarding. The basic loop-making stitch is very simple, but you need guide yarn to keep the strip from tangling on itself, plus it's a good idea to tie at least one side of the loops into clusters of 50 so you can keep your count straight... it looks messy, and unwieldy, and like you're going to use up a lot of yarn just making a tangle.

But then all of the 600 loops are finally made, and it's time to do a joining pattern. I just used a simple fan pattern, which was included in the instruction booklet that came with the loom. The pattern is four groups of three loops, then one group of twelve loops. The pattern gets reversed on the other side of the strip. The loop joining went very quickly. It took less than a quarter of the time it took to make the loops in the first place. It is good after the discouragement of making the big mess of loops to obtain the final effect with relatively little effort.

I made two strips, then joined them together with small UK treble crochet (US double crochet) clusters. The result was a scarf which was, sure enough, about two metres long, and about fifteen centimetres wide.

The point of the exercise was to learn a new method and to decrease my stash by at least a little bit (the scarf used up about a ball and a half of the Voluma). I brought it in to show Bonnie, my chiropractor's office manager, and she liked the scarf so much that I gave it to her. So it was a win-win — I love it when that happens!

I like the look of hairpin lace when it's finished, but it's a bit of a one-trick pony. Certainly it's a good way to use up either ribbon yarn, or, as here, yarn with some fuzz to it — any type of yarn has some texture and interest to it on its own, so that it looks nice in those loops. I'd like to try making medallions (circles of loops) next time.

All of the scarf photos here, incidentally, are taken in the waiting area of the Beaches Wellness Centre's offices. I love how the wood planking looks behind the yarn!