"quirk"

a way east easter by Katherine Hajer

I have two nieces. On Easter the eldest one was two and a half years old, and the youngest one was three weeks. So neither of them are into chocolate much yet.

I got told to buy them picture-books, which was perfectly cool by me, but picture-books look so lonely in a gift bag. The stupid bag keeps collapsing.

Then I remembered this Chinese zodiac amigurumi set of patterns that knit.1 magazine published a while back. It's now a free pattern to download (that's where the link goes to). I took the Year of the Rabbit pattern and Eastered it up into two dolls, one for each niece. The only mods necessary were to embroider the faces instead of using the recommended buttons, and to add the neck ribbon/flower to make them look more seasonal. The flower petals are tacked down so that little fingers can't pull them off.


I used dishcloth cotton for the bodies and neck decoration, and the faces are embroidered with cotton floss. I wanted something that wouldn't taste/feel yucky if a little one decided to teethe on an ear or an arm, and to make them more washable.

They were quick and unfussy to make, good TV crocheting, and I got a kick out of using a Japanese crochet aesthetic to appropriate a Chinese zodiac symbol for a European holiday.

thinking too much by Katherine Hajer

I finished these socks recently:


The pattern is from Cookie A.'s Sock Innovations. They were dead easy to knit, and I like how the ribbing, diagonal lace panel, and plain stocking stitches work together to warp the self-striping when the socks are worn. Which is just as well, because I've tried no fewer than five different patterns on this yarn and hated the knitting, or the results, or both, for all of them except for this last (sixth) attempt. This yarn was The Yarn That Didn't Want to Be Anything for over five years. It probably doesn't help that the stripe colours and the background colour remind me of sweat socks from the mid-70s.

If the socks were over-thinking materials with pattern, this bath mat had me over-thinking the execution:


The pattern is the Doris Daymat from The Happy Hooker book. I've been wanting to make this as a bath mat for years, but could never wrap my head around estimating the yarn quantities for a finer gauge and a different mat size. I finally had a "duh" moment, found a baby blanket estimate in Ann Budd's handy crochet brochure, and everything worked out swimmingly. (Okay, except for the edge distortion you can see in the photo, but I'm trying to pitch that to myself as "whimsy" because I can't bear the thought of taking it out and doing it over with fewer stitches on the short edges.) I already have another one on the go. Incidentally, the flowers can be detached and reattached easily for those times when less funky decor is required.

Lesson learned: don't make things so complicated that execution paralysis sets in. When in doubt, try it out.

happiness really is a warm gun by Katherine Hajer

I'm on the record for hating what I call "white glue crafts." You know, you buy a kit with all these pre-cut, pre-fab pieces, and then you stick them together, and then you get to tell people you made it. But you didn't; you just assembled it.

Therefore, it's taken me a long time to come to terms with the idea that you can be creative and use glue at the same time. Glue for practical purposes, sure! I have at least three different kinds on the "interesting chemicals" shelf in the laundry room, right next to the itty bitty pots of house paint and the WD-40. But glue to make stuff with...

I broke down a little when I wrecked my old coffee table's surface and re-covered it with decoupaged Ansel Adams photos from an old calendar. Then I made the DIY souvenir van Gogh coasters by, um, appropriating the materials from a kit J-A had given me and basically throwing out the instructions.

Then I made the book purse that Jake sent me the instructions link to. Making that necessitated buying a glue gun.

I now understand why people get so enthused about glue guns.

After I was done the purse, it occurred to me that I still had twenty-two glue sticks left (would have been more, but as a novice gun-slinger I had to re-do parts of the purse). The first thing I did was fix the Elizabethan blackwork embroidery I have hanging over the entranceway to my kitchen, so that it doesn't sag anymore:

(Hey, it is Elizabethan blackwork... just modernised from Subversive Cross-Stitch. You were expecting?)

It used to be that this piece's top flap had pulled away almost completely from the backing. It's been weeks now, and it's still nice and snug. Yes, I know I didn't centre it properly, but that's not the glue's fault.

Then I took some heavy-duty clear plastic, added hot glue to it, and patched over the two ripped holes in my shower curtain (because I haven't found a red poppy curtain to replace it with yet). I used a one-hole hole puncher to punch new grommits in the curtain, and the results look like this:
You can tell, but you can't tell a lot, and it looks better than having the first foot of the shower curtain off the rings.

Having accomplished these wonders of home decor repair, I unplugged the glue gun and let it cool down. That was a couple of weeks ago, and everything is still holding up wonderfully, including the book purse.

I discovered recently, however, that the circuit board earrings I made a long time ago are not in good shape. One of them has come completely off its earring findings.

Might be time to pack some heat and ride out into the DIY repair sunset again...

two favourites in one by Katherine Hajer

Early this past spring the ever-blogworthy Jake sent me this Remodelaholic link for how to make a book bag. That's a purse made from a book, as opposed to a bag made to carry around books. I've been looking at versions of these at various art and crafts shows for ages, so the instructions for how to make my own were like being handed the question for life, the universe, and everything.

Since then, I've been collecting all the odds and ends required to make the bag. I even caved in and bought my own glue gun (more on the immediate mischief that caused around the apartment in a later post). I also found some variations on the instructions on other sites, like this Country Living version, but in the end I stuck pretty close to Remodelaholic's version. It seemed the most structurally sound and usable.

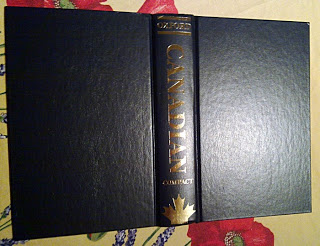
Last weekend I was finally ready. The fabric was washed and ironed, the pages were cut out of the Canadian Oxford Dictionary I'd selected for sacrifice (common enough not to be a heavy loss, but pointedly an Oxford dictionary, not one of those Webster-wannabes), and the glue gun was warmed up. Here's how it all went down:

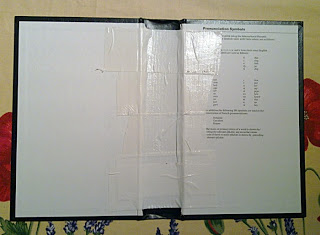
Here's the book cover after the pages have been cut from it. At this point, the spine is fairly fragile, since it was designed to be flexible when the book was being used. This was the part where I took all the measurements I'd need later to cut the fabric to size.

I followed Remodelaholic's lead and reinforced the spine with duct tape. Fortunately, I had white duct tape handy, because the lining fabric I'd chosen was a print with a white background. The duct tape reinforces the spine and makes it sturdy enough to be the bottom of a bag. I added a second, lengthwise layer after I took this shot.
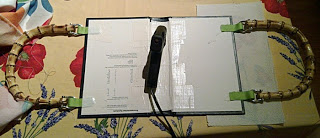
Some instructions say to glue-gun the handle ribbons in place; others say use duct tape. I did both.
After that, it was a case of measuring, cutting, and pressing the fabric, then gluing the pieces into place. I am a glue-gun newbie, so I wound up having to re-do some steps and didn't do as neat a job as I'm used to managing in other media. Things still turned out presentable enough, though, and I got away with only light first-degree burns to my left index finger.

Next time (I've already decided there will be a next time) I'm going to use a bigger book. The spine on this book was about the minimum width I'd want to contemplate for a purse — it just fits my wallet  — but the length and depth could be greater, or else the purse handles could be smaller. Even still, I'm pretty happy with it, and will definitely be using it!