"home"

crochet as decluttering by Katherine Hajer

We just had a long weekend in Canada, which means I did some decluttering. Some of this was pretty basic, along the lines of "if you can't stand seeing it there and there's nowhere else to put it, throw it out." Some of it required another level of thinking:


Like a lot of DIYers, I have a stash problem. I have tons of excuses for it: I used to live in a much bigger apartment where I had an entire room devoted to stash, I inherited stash from two different people, yarn is the one thing besides books I will go shopping for when I'm stressed out... the point is, I have too much damn yarn. I have a sixty-square-metre apartment now, and there is yarn in every single room except the kitchen and washroom.

And there used to be yarn in the kitchen (in the freezer, if you were wondering).

The need to transform yarn into finished objects inspired the Knit that Shit meta-project, which after a brief winter hiatus is ramping up again for the 2013 session. I can envision a day when KTS is a seasonal competitive activity, sort of a marathon version of the Ravelympics, but it's not there yet.

I treat KTS like a giant game of Flux, changing the rules as real life and my own whims intervene. So long as the overall direction is towards finishing the projects and clearing out the excess stash, I'm okay.

The end-goal is to have all the stash yarn fit into the cedar-lined blanket box I inherited from the grandmother who taught me how to knit, with one (one!) WIP basket beside the couch.

I'm years from that. Instead, I'm running Knit that Shit with the current Flux rule that I'm allowed to start a new project if, and only if, it is mostly using up stash yarn. I can buy new yarn to complete the project, but it has to result in a net loss of stash.

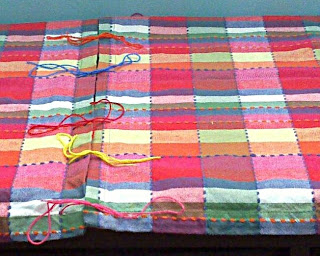
Hence the striped squares blanket project:
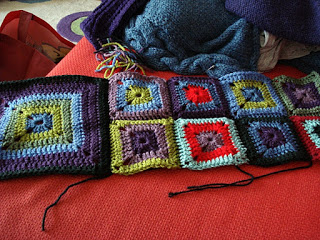
It's using up ten skeins of various acrylic how'd-that-get-there, plus I bought four more to balance off the colour scheme. Well, that and I want to make the blanket bigger than what the Patons pattern (login required to download, but free) I'm following said to do.

So far I'm about 20% done. Not bad. It will feel good to have it finished.

This is the first time I've worked in acrylic for a while. I acknowledge that sometimes acrylic is the best way to go for some things, but more and more even the nice acrylic squicks me out. The price of acrylic has gone up with the price of oil, but the price of wool has been holding pretty steady and is a comparative bargain again, even for the good stuff.

This blanket will be fine to keep in the living room for when I get a chill when I'm sitting on the couch. But I don't think I'd work a large piece in acrylic again.

sugru you by Katherine Hajer

I know I haven't updated this blog in ages, but it's not because I haven't been doing any DIY — far from it. A few of the bigger projects are still not yet ready for prime time, but a lot of other ones are completed.

The ever-cool Cathy gave me several packs of Sugru for my birthday last year. Sugru is a kind of silicon clay that has the texture and viscosity of stiff plasticine when fresh, and is sort of like an old-school pink pencil eraser when cured. It comes in lots of fun colours, and is intended to be used to "hack things better" — to repair, make, and improve things.

I went on the web site and had a look at the suggested uses to get an idea of what to do with the stuff. It's one of those things that when you first encounter it, you think, "that's interesting, but I don't know if I'd ever use it," but then once you find the first use, you can't stop finding things to do with it.

Not all of my attempts were successful (the web site warns you about that), but everything I made with it last autumn is still working great.

The very first thing I did was use a pack of Sugru to make better (and semi-permanent) cushions for a pair of cell phone earbuds I have. The original ones were constantly coming off and getting lost, and just weren't that comfortable. I got this straight off the Sugru web site, so no photos.

The next thing I did was a bit more original. My laundry room (more like a laundry closet) just has a bare light bulb sticking out of the wall to illuminate it. The room is so tiny and crowded the bare bulb has a hard time lighting what I need to see, so a proper shade did not appeal. Instead, I made this so-ugly-it's-fun beaded cage to put around the light. The Sugru is the blue and orange stuff next to the wall. It holds the main structural wires together and pads the wall against the wire of the cage:


The idea for a light bulb cage came from a photo of Little Edie's room at Grey Gardens.

My first experiments showed that Sugru is best for sealing something (including something that needs to be waterproof, since it's silicon), or making something more ergonomic, or padding something. Next time I get some packets of it I'm going to check over the suggestions for shoe repair on the web site very carefully.

how to save $30 without even a sale on by Katherine Hajer

I have a storage unit in my bedroom that sits under the windowsill. Its purpose in life is to hold yarn until I finally get my yarn stash down to reasonable levels. Then it will be stood on its end and repurposed to hold books.

In its current working conditions, it gathers a lot of dust, so I had the brilliant idea to buy a table runner to cover it up. I would much rather wash something in the laundry every once in a while than dust it every week.

So I popped down to a home decor place in my neighbourhood that shall remain nameless, and was completely sticker shocked by the prices on table runners. They went for $50 or more.

Then I noticed one of those Grossly Unfair Price Things: while the table runner I wanted was about $50, the matching napkins that went with it were only $4 apiece. I bought four, ran home giggling to myself, and threw them in the washer and dryer.

They came out wrinkly but not ruined, so I ran them over with an iron. I thought of a few ways to connect them together, but decided on a no-sew method: I just picked seven colours from my embroidery floss stash and tied them together at regular intervals, using the plaid pattern as a guide:
I had some fun staggering the floss colours on each subsequent joining, but otherwise didn't fuss too much. Three joins and twenty-one bows later, I was done:

The floss came from one of those big mixed bags of colours they sell for $20 or so. I used maybe $2 of floss, so the whole thing came to about $18. The napkin table runner is the perfect length and depth, with just a little bit of overhang on all the edges. It's actually more functional than the prefab runner back at the shop, which was narrower and would have left me with a thin strip of exposed laminate to dust (and what's the point of that?).

I know that if I'd done some fabric shopping I could have saved even more money, but there aren't any fabric shops near me and this plaid did match my bedroom decor exactly.

Had any thrifty success stories lately? Let me know in the comments!

white glue stuff (aka DIY souvenirs) by Katherine Hajer

Nearly two years ago, the ever-innovative J-A gave me a housewarming present for my (then) new apartment. It was a kit to transfer copies of photos or other graphics onto little tiles of champagne-coloured marble and make coasters out of them. Since I was in the throes of moving house at the time, I stuck the kit on the top shelf of my front-hall closet.

It sat there until this spring, when I pulled it down and read the instructions. Some of the process sounded like what I had done to my old coffee table when I ruined the surface (long story) — I cut up bits of an old Ansel Adams calendar a co-worker gave me and collaged the whole thing, then sprayed it with several coats of varethane. Here's an old photo that shows the table top:


I'm not big on what I call "white glue crafts" — anything that involves sticking bits of things together with white glue purely for decorative effect. But, as the refinished coffee table shows, even white glue can be used to fix things so that they're not only useful, but look good.

The coasters are useful too, of course. I wasn't too keen on getting photos laser printed on special paper at a printing services place, though, especially when the kit came with a special list explaining to the printer that although the supplied (and required) paper was plastic-coated, it wouldn't melt in the (required) colour laser printer.

That sounded like too much negotiation to make four coasters.

Then I went to Amsterdam on vacation. At the van Gogh Museum gift shop I found a pack of serviettes printed with one of my favourite van Gogh paintings — his Butterflies and Poppies still life. It seemed to me that serviette paper should be thin enough to glue well to the marble, and usually serviettes are printed so that the ink doesn't run easily (they wouldn't work well as serviettes otherwise).

It worked! Each serviette had two layers: a printed layer and a plain white layer. I separated the layers and just glued the printed one in place, then kept adding thin applications of glue/glaze until I ran out. Then I added the little cork feet that were included in the kit. The results look like this:

I love how they turned out, and I'm sure they'll be very useful.

As always, I have to wonder with a kit like this how easy it would be to just collect the materials yourself and make your own. Certainly cork pads are cheap and easy to find, as is white glue (and water to thin it with), foam brushes, and cheesecloth to wipe away excess glue. The little square of sandpaper came in handy too, so add that in to the list.

That leaves the marble squares themselves. From their size and thickness, I'd guess that these were originally destined to be part of a wall or floor, but they have irregular edges and some badly damaged corners. For coasters, that adds a little design element, but I can understand not wanting to grout them. If they can be had (and had by the each or in small quantities, with no mesh backing), then I can see making more of these.

drat. by Katherine Hajer

The cliché is that there are three kinds of lies: lies, damned lies, and statistics. In actuality, there is a fourth: paint chip cards.

I really liked what the previous owner of my condo had done with the washroom. The vanity countertop is a mix of greens and a brown-beige in sort of a marbled pattern. You can see it used as a background in a lot of my beading photos, like for this post. She'd painted the walls a warm sage green that had lots of beige in it. It looked great with the counter-tops, the pale grey tile floors, and the white trim and porcelain. Normally I don't go for warm tones, but it looked great with my red poppies shower curtain and vanity set.

The only thing I (respectfully) disagreed with the previous owner about was the towel racks. You see, she liked brass, which is the one finish I absolutely can't stand. I'm more of a pewter/stainless steel person.

I took down the brass hooks on the back of the washroom door and replaced them with pewter ones fine, but there were a lot of towel racks to take down — a grand total of four. In addition, there were lots of clusters of pin-holes in the walls where thumbtacks had been used to hang up small pictures. I had to do a lot of spackling on both of the main walls. The only recourse was to repaint.

I spent a lot of time holding up paint chip cards to the walls, and settled on a colour. The local paint store, who had stood me so well back when I repainted my bedroom, let me down. They kept recommending light, very light colours for the bathroom. From a decorating point of view I understand, because it is a small room with no windows, but that vanity counter really needs something to pull it together with the rest of the room. I am not in a financial or aesthetic situation where I can think of replacing the vanity counter. Besides, I like it.

The quart of paint I bought looked like trouble as soon as I opened the lid, but the staff at the paint store had assured me that the colour would darken considerably as the paint dried.

They lied. The first wall I did is touch-dry now, and it's much lighter than what was on the paint chip, never mind the warm sage green I was going for. It's white. It looks like primer with a slight sage green tone. It makes the washroom look like it's the staff washroom in a sub-par retail outlet.

All right, all right, I know that colour is never guaranteed when you buy paint, but this isn't even close. It is several shades lighter than the original colour, which I knew I wasn't going to match perfectly, but wanted to get as close as possible to. Now I'm going to have to repaint entirely, possibly even use two coats to cover up the debacle currently gracing the walls.

The only good news is that the room takes less than the length of one CD (the Trainspotting soundtrack, if you really want to know) to paint, albeit with less than my usual care in the corners because I was annoyed when I was doing the work.

I would post photos, but photos don't tend to turn out well because of the aforementioned windowlessness. The flash distorts the wall colour a lot. I will, however, try for photos when I finally have my happy ending to this adventure and get the damn walls the colour I want!

DIY with paint by Katherine Hajer

If you read both this and my main blog, you know that I moved to a new apartment over the summer. Everything was pretty much the way I wanted it, except for the colour of the bedroom walls. The previous owner had painted the room a very dark blue, which went great with her light-coloured oak furniture, but not so great with my black metal furniture:


I wear black most days, but it's not how I decorate.

There was one big obstacle to getting the painting done: I'd never painted a room before. I talked to lots of people about it, and got responses ranging from "it's easy, just read about it on the net and go for it" to "ugh! what a lot of work! and it always turns out badly! hire someone!".

I almost hired someone, but when I thought of how the logistics of that would work, it seemed that trying to do it myself was a lot better. Either way I was sleeping on the couch (a very comfy sofa bed, but nevertheless a couch) for a couple of days.

So I read about it on the net, used a paint calculator to figure out how much I needed, and went from there (the Benjamin Moore site helped me; I'm sure there's other places). And you know? If you decide that painting is what you're doing that day, and don't plan on doing anything else, it's not that bad. My only regret is that I didn't talk to the ever-practical Brenda beforehand: she recommends painting in your underwear if you're by yourself or comfortable with the people you're painting with, because paint is easy to get off skin, but nigh-impossible to get off clothing. Thanks to Beryl, Cila (sorry if I spelled your name wrong), Howard, Eric, and Andreea for all the hints. Thanks also to the ever-amazing Jan for creating lots of examples of how paint can transform a room.

Saturday: removed furniture, emptied closet, removed closet doors, removed electrical faceplates, taped, tarped, and did 2 coats of primer. The dark blue was still showing through the primer, but I had two cans of paint as opposed to one can of primer, so I was still optimistic.


Sunday: crash. Clifford the big red couch got folded out as a bed and did a great job. The mattress and support frame are almost exactly like my regular bed. Very comfy.

Monday night: Decided that sleeping on the couch for a week, waiting until the following Saturday was not going to cut it, despite Clifford's excellent attributes as a bed. Having my clothing scattered over the rest of the apartment in garbage bags and stacked on other furniture was also a factor. So at 8:00pm I opened one of the cans of paint and started painting. I had two coats finished around midnight (only one coat inside the closet because otherwise I'd run out of paint and have to start the second can) and was amazed. Everything had been covered up.

Tuesday night: Removed tarp & tape, then touched up baseboards, ceiling, and closet shelves with a sample bottle of Debbie's White by Debbie Travis. If you get on your hands and knees you can see the touch-ups, but otherwise not. I also removed excess paint from light switches and electrical plugs (not all mine, the last paint job had left this too) with Q-tips and nail polish remover. Replaced faceplates. Removed antique brass faceplates from living room and bathroom, and discovered they were there to camouflage that the light switches had paint on them. More Q-tips and nail polish remover. Replaced face plates with nice clean-looking white ones. I seem determined to make this place look like it's from 1963, but it's working out well.

Tuesday also saw the furniture get replaced in the bedroom, being careful to avoid the touched-up parts of the baseboard. Slept in the bed.


(this isn't quite the colour, thanks to the camera flash, but you get the idea)

Wednesday night: Closet touch-ups were dry, so the clothes got put away. Interestingly, there is way more room now than there was before. Side benefits!

Verdict: You can definitely tell it's an amateur job, but I was painting over another amateur job, so I don't feel bad. When the day comes to sell, I'll have to paint it off-white or something else boring, but for living in, it is fabulous.

Postscript: there was one faceplate that had no holes in it. When I took it off, I found these wires. The clear red knobby things say "3M" on them. If anyone knows what these are, please let me know!