"design"

happy you! a free pattern for yule/solstice by Katherine Hajer

When my brother Rob and I were very little, we misheard our grandmother's seasonal greeting of "Happy Yule!" as "Happy You!". Of course we were happy — we were getting presents and treats. Does it get any better than that for a kid?

Oma thought this was hilarious and never bothered to correct us. Which, in a family where all the grownups knew at least three languages while the Canadian-born kids only had English and whatever French they'd learned at school, was pretty normal.

Along with all the regular presents we would each get a pair of slippers Oma had knitted us. Unfortunately for Oma, we learned very quickly that these slippers made it very easy to "surf" laminated flooring, so they were usually worn to holes in about a week.

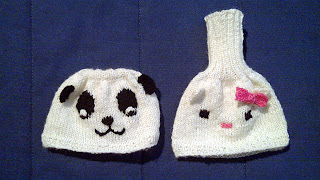
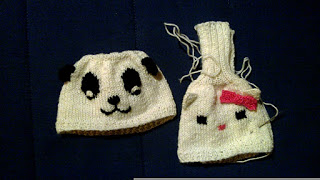
This year, I've been requested to make cute animal boot cuffs for my nieces. Fingers crossed they won't wear out quickly — they have no soles, so they're no good for surfing laminated flooring — but since the design work took far more time than the knitting, I thought I would share them as a Yule present for any knitter who would like an extra stocking stuffer for little ones. Mine are of a kitty and a panda, but dogs, pigs, foxes, brown bears, and other animals could be figured out by mixing and matching different facial features and colours. I rather think the kitty's hair bow would make a cute bow tie on a bear or a dog.

I'd rate this project as beginner-level, so long as you're okay with doing a bit of free-form embroidery. If you're a knitter who only knows how to knit, as opposed to someone with a general background in needlecraft, this would be a good opportunity to stretch your skill set. The knitting part is very quick; if you're exchanging gifts on the 24th or 25th, you still have time.

Download the pattern PDF here. If you have any feedback (especially if you find something that needs correcting!), please leave a comment!

Happy Yule!

no pressure or anything by Katherine Hajer

This is where the most-finished boot cuffs for the nieces were at, as of this afternoon:


That's supposed to be a panda on the left, and a Japanese-style cartoon kitty (like a Hello Kitty) on the right. I feel pretty good about the panda, but am not entirely pleased with the kitty. However, that might just be because she's not supposed to have a mouth.

The panda shows how the boot cuffs get worn — with the ribbed part around the wearer's leg and the cute animal part cuffed over. The kitty shows the full structure.

The other two cuffs are knitted, but not embroidered. I also have to knit two sets of ears (one panda, one kitty), and one more pink bow.

Then it's back to the tiger jacket, which is looking less and less likely to get done on time. Oh well, technically it's for the elder niece's birthday. Erm, which gives me an extra week.

all settled in for the zombie apocalypse by Katherine Hajer

The interesting thing about DIY is that you can do a completely accurate estimate for how long something should take... and then be off by several weeks because one simple task pushes you way out of your comfort zone.

For Cheshin's birthday (13 March), I started working these zombie cross-stitch embroideries I got as a kit of all things. No problem: cross-stitching was one of the first things I ever learned how to do with a needle. I was three or four years old when I mastered this stitch.


The cross-stitching went well and was easy enough, although the floss from the kit had a bad habit of tangling and knotting on itself.

Then came the part where I had to cut the fabric into strips of the correct height and width, sew a cushion top, and then sew a matching back. I'd decided to make "sandwich baggie" backs with overlapping panels instead of installing a zipper. Partly this is because I've never installed a zipper in my life, and partly because I hate it when you lean your head on a cushion and get a cold metal zipper tab pressing into your face.


All well and good, except that I am absolutely awful at cutting fabric. I mean seriously awful. It doesn't matter how carefully I measure, or how painstaking I am about cutting on the line — the fabric will shift and come out crooked, every single time. In point of fact, there is a sample of fabric missing from the these photos, because one length of fabric got so butchered that I couldn't get anything usable out of it and had to buy a replacement.


Once I got to the sewing part, it wasn't so bad. I can operate a sewing machine well enough to do basic straight stitch without embarrassing myself too much. I even remembered to not reinforce the top stitching around the embroidery, and to bring the threads to the back to knot instead. (In case you are good at sewing and are having a good laugh because this is such a basic thing... hey, I'm a phobic sewer. Everyone has their weak spots.)

The happiest coincidence in this process is that when I went to buy the replacement fabric, I found something that repeated a motif from fabric I already had: the brain-cushion's white flowers are a scaled-up version of the ones on the hand-cushion.

These were also good confidence-builders. I now feel better about sewing the dining room chair covers I reverse-engineered the pattern for months ago, and about sewing the vintage-style purses I got the pattern book for even more months ago.

Here's the trio in their new home on Cheshin's chaise longue (photo by Cheshin, naturally):


two designs in one by Katherine Hajer

Sometimes I think each issue of Knitty is a challenge whereby knitters have to pull inspiration and recombine the pattern ideas to make something totally new. Or, as many of my knitting friends would tell me, I think too much.

It's hard to ignore coincidences like this, though. I've been wanting to make one of those cardigans with very long fronts, sort of like shawls with sleeves, and Knitty featured one called Daedalus in its Spring + Summer 2011 issue. I loved the shape, the instructions, and the faux cable border. Even though I liked the staggered eyelet pattern called for in the original design, though, I thought it was a shame that there wasn't a feather pattern. I've had a thing for shawls with feather patterns ever since I saw a magnificent example of one someone else had made at the Naked Sheep.

As it happens, in the very same issue of Knitty, there was a shawl pattern called Lilah that featured lace feather motifs. Again, the original pattern is goregeous, but it was just one of those peanut-butter-and-chocolate moments where two separate things combined very well.

I decided to just keep the faux cable pattern at the top of the Daedalus cardigan (instead of the top and bottom as in the original), and use the Lilah feathers for the rest of the body and the sleeves. To make things symmetrical, I knitted from the centre back on a provisional cast-on for one half of the jacket, then from the centre back again for the other half. The feather motifs were lengthened to match the pattern repeat length of the faux cables, the faux cables were mirror imaged to make knitting from the centre back easier, and the sleeves were knitted from the top down instead of side to side as in the original.


Hardly took any work at all. No, really, it didn't. The feather motifs all have a central part where you just repeat the same pattern row X amount of times to make up the length, and the Daedalus schematic clearly shows how big the sleeves need to be (and they're just plain rectangles, so no shaping to recalculate).

I decided that the final feathers should be twice the length of the overlapping ones. Because of how the motif transitions work, the final row of feathers is slightly longer than the second-last row — perfect. Here's the body drying on the floor after being stretched out with blocking wires (the light-coloured short lines in the cardigan are waste yarn which was unpicked to create armholes):

I did a little bit of fudging at the centre back so that the flip line where the lace mirror images is a true flip, instead of being half a stitch off as in "normal" knitting in the reverse direction. Since I rotated the working of the sleeves by ninety degrees, I set them into the body of the cardigan using a three-needle bind-off.

The finished cardigan is wonderful warm to wear, but light and comfortable.

Should mention: the yarn is Tove by SandnesGarn, and it was only five dollars a ball at Romni. It's not the softest stuff in the world, but I've just been wearing a t-shirt under the cardigan and it's been fine. It comes in lots of colours, and is a heavy fingering/light sport weight. The dark colour rubbed off on my hands when I was knitting it, but since washing and block it's behaved itself.

faux twinset by Katherine Hajer

I made this faux twinset cardigan from a knit.1 pattern:


It's knit from the top down, and since I had already bought both the purple yarn and the buttons for a different project, it even counts as stash reduction.

Modifications: the original pattern instructed the knitter to work the cardigan in intarsia after the collar was completed. No thanks — I made the olive green part first, then worked the blackberry stitch fronts. I'm okay with intarsia when it's the right technique to use, but managing five full balls of yarn just to avoid four perfectly straight seams is silly.

I also got rid of the strip of contrast-colour blackberry stitch that was supposed to go in the back. The whole reason I wanted to make this is because it looks like you're wearing a cardigan under another cardigan. Having a stripe down the back would ruin the effect.

The third major modification was to change the straight neck to a deep crew neck. The original pattern didn't have the collar dip down like that. I noticed that the photo in the magazine showed the model wearing the top few buttons undone to create a neckline, and decided to knit that in. It makes for a more comfortable neck, and it sits better.

The one thing I wish I had done was make the collar deeper as well. It needs it with the more-rounded neckline, but that wasn't obvious to me when I was working it top-down. Live and learn.

sugru you by Katherine Hajer

I know I haven't updated this blog in ages, but it's not because I haven't been doing any DIY — far from it. A few of the bigger projects are still not yet ready for prime time, but a lot of other ones are completed.

The ever-cool Cathy gave me several packs of Sugru for my birthday last year. Sugru is a kind of silicon clay that has the texture and viscosity of stiff plasticine when fresh, and is sort of like an old-school pink pencil eraser when cured. It comes in lots of fun colours, and is intended to be used to "hack things better" — to repair, make, and improve things.

I went on the web site and had a look at the suggested uses to get an idea of what to do with the stuff. It's one of those things that when you first encounter it, you think, "that's interesting, but I don't know if I'd ever use it," but then once you find the first use, you can't stop finding things to do with it.

Not all of my attempts were successful (the web site warns you about that), but everything I made with it last autumn is still working great.

The very first thing I did was use a pack of Sugru to make better (and semi-permanent) cushions for a pair of cell phone earbuds I have. The original ones were constantly coming off and getting lost, and just weren't that comfortable. I got this straight off the Sugru web site, so no photos.

The next thing I did was a bit more original. My laundry room (more like a laundry closet) just has a bare light bulb sticking out of the wall to illuminate it. The room is so tiny and crowded the bare bulb has a hard time lighting what I need to see, so a proper shade did not appeal. Instead, I made this so-ugly-it's-fun beaded cage to put around the light. The Sugru is the blue and orange stuff next to the wall. It holds the main structural wires together and pads the wall against the wire of the cage:


The idea for a light bulb cage came from a photo of Little Edie's room at Grey Gardens.

My first experiments showed that Sugru is best for sealing something (including something that needs to be waterproof, since it's silicon), or making something more ergonomic, or padding something. Next time I get some packets of it I'm going to check over the suggestions for shoe repair on the web site very carefully.

wardrobe stuff by Katherine Hajer

I have this bad habit of knack for wearing out the left elbow on my jackets. Not just knitted ones — store-bought blazer-type ones too. Not only do I get to be annoyed by having a jacket that is perfectly wearable except for the one elbow ruining it, but I get to have insult added to injury when various people tell me to get those suede patches that everyone loved to hate in the 70s.

Right. Because suede patches look so incredibly good on tailored suit jackets

Instead, I've been busy making up some knitted jackets. Not cardigans, exactly, although technically I suppose they are. "Cardigan" implies something casual. These are office-ready, and have some dressmaker details to make them more tailored-looking.

The first one I finished is a Fiona Ellis pattern:
It's a basic shaped jacket, with just a little two-colour work as trim. I made two changes from the original design. The first change was to add hems to the bottom of all the body pieces. The original pattern just called for a few rows of the contrast colour in garter stitch, and it was doing absolutely nothing to keep the edges from curling, so I had to rework.

The second change was to omit the floppy pleated cuffs and replace them with a plain hem that had the same trim as the front and neck bands. I thought the dramatic cuffs were great, but not terribly practical for the office. I have to type a lot for my day job, and worried I would have to do a Liberace-style wrist flourish every time I went to edit a new version of a requirements document.

The second jacket is from a recent issue of Interweave Knits:
This one had a lot more mods to the original pattern.

  • I added extra rows of garter stitch to the bottom of the body and sleeves to keep the lace edging from curling. It still does, a little bit. The directions said steaming would get rid of this. I am not inclined to steam a jacket every time I want to wear it, so decided to let the knitting do the work.
  • I added a 5-stitch garter stitch border at the fronts of the body's lace edging so the edges wouldn't curl in. The original pattern called for the knitter to flip back X number of stitches and tack them down to the wrong side. "X" didn't equal a pattern repeat or half-repeat, so the lace on the back of the facing wouldn't have lined up with the front of the facing. I had to re-jig the stitch counts a little, but was pleased with the garter stitch.
  • The stranded colourwork (the stylised plants around the body) were worked in the round with a steek up the middle, because purling back through a 25-st repeat with no symmetry in it did not appeal.
  • I worked the colourwork chart so that only whole motifs were knitted in, instead of partial motifs per the instructions. I figured since I was creating the fabric instead of working with printed & cut stuff, I could pull off little niceties like that.
  • Because of the steek, I changed the way the front facings were worked from the original directions.
  • I added some rows of I-cord and I-cord knot buttons with loops to close the fronts. The original pattern had a single hook-and-eye closure just below the collar.
  • I made the sleeves full-length, instead of the original 3/4 length. If I'm wearing a 100% wool jacket, I want to stay warm. Also, 3/4 sleeves look ridiculous on me.
I don't think the alterations on either of these were any big deal — having it "your way" is a big motivator in DIY. Even with all the mods to the purple jacket, I only needed one sticky note to track all the numbers, and it's still perfectly recognisable as a rendition of the original jacket in the magazine.

What are your favourite DIY wardrobe tricks?

how to save $30 without even a sale on by Katherine Hajer

I have a storage unit in my bedroom that sits under the windowsill. Its purpose in life is to hold yarn until I finally get my yarn stash down to reasonable levels. Then it will be stood on its end and repurposed to hold books.

In its current working conditions, it gathers a lot of dust, so I had the brilliant idea to buy a table runner to cover it up. I would much rather wash something in the laundry every once in a while than dust it every week.

So I popped down to a home decor place in my neighbourhood that shall remain nameless, and was completely sticker shocked by the prices on table runners. They went for $50 or more.

Then I noticed one of those Grossly Unfair Price Things: while the table runner I wanted was about $50, the matching napkins that went with it were only $4 apiece. I bought four, ran home giggling to myself, and threw them in the washer and dryer.

They came out wrinkly but not ruined, so I ran them over with an iron. I thought of a few ways to connect them together, but decided on a no-sew method: I just picked seven colours from my embroidery floss stash and tied them together at regular intervals, using the plaid pattern as a guide:
I had some fun staggering the floss colours on each subsequent joining, but otherwise didn't fuss too much. Three joins and twenty-one bows later, I was done:

The floss came from one of those big mixed bags of colours they sell for $20 or so. I used maybe $2 of floss, so the whole thing came to about $18. The napkin table runner is the perfect length and depth, with just a little bit of overhang on all the edges. It's actually more functional than the prefab runner back at the shop, which was narrower and would have left me with a thin strip of exposed laminate to dust (and what's the point of that?).

I know that if I'd done some fabric shopping I could have saved even more money, but there aren't any fabric shops near me and this plaid did match my bedroom decor exactly.

Had any thrifty success stories lately? Let me know in the comments!

white glue stuff (aka DIY souvenirs) by Katherine Hajer

Nearly two years ago, the ever-innovative J-A gave me a housewarming present for my (then) new apartment. It was a kit to transfer copies of photos or other graphics onto little tiles of champagne-coloured marble and make coasters out of them. Since I was in the throes of moving house at the time, I stuck the kit on the top shelf of my front-hall closet.

It sat there until this spring, when I pulled it down and read the instructions. Some of the process sounded like what I had done to my old coffee table when I ruined the surface (long story) — I cut up bits of an old Ansel Adams calendar a co-worker gave me and collaged the whole thing, then sprayed it with several coats of varethane. Here's an old photo that shows the table top:


I'm not big on what I call "white glue crafts" — anything that involves sticking bits of things together with white glue purely for decorative effect. But, as the refinished coffee table shows, even white glue can be used to fix things so that they're not only useful, but look good.

The coasters are useful too, of course. I wasn't too keen on getting photos laser printed on special paper at a printing services place, though, especially when the kit came with a special list explaining to the printer that although the supplied (and required) paper was plastic-coated, it wouldn't melt in the (required) colour laser printer.

That sounded like too much negotiation to make four coasters.

Then I went to Amsterdam on vacation. At the van Gogh Museum gift shop I found a pack of serviettes printed with one of my favourite van Gogh paintings — his Butterflies and Poppies still life. It seemed to me that serviette paper should be thin enough to glue well to the marble, and usually serviettes are printed so that the ink doesn't run easily (they wouldn't work well as serviettes otherwise).

It worked! Each serviette had two layers: a printed layer and a plain white layer. I separated the layers and just glued the printed one in place, then kept adding thin applications of glue/glaze until I ran out. Then I added the little cork feet that were included in the kit. The results look like this:

I love how they turned out, and I'm sure they'll be very useful.

As always, I have to wonder with a kit like this how easy it would be to just collect the materials yourself and make your own. Certainly cork pads are cheap and easy to find, as is white glue (and water to thin it with), foam brushes, and cheesecloth to wipe away excess glue. The little square of sandpaper came in handy too, so add that in to the list.

That leaves the marble squares themselves. From their size and thickness, I'd guess that these were originally destined to be part of a wall or floor, but they have irregular edges and some badly damaged corners. For coasters, that adds a little design element, but I can understand not wanting to grout them. If they can be had (and had by the each or in small quantities, with no mesh backing), then I can see making more of these.

drat. by Katherine Hajer

The cliché is that there are three kinds of lies: lies, damned lies, and statistics. In actuality, there is a fourth: paint chip cards.

I really liked what the previous owner of my condo had done with the washroom. The vanity countertop is a mix of greens and a brown-beige in sort of a marbled pattern. You can see it used as a background in a lot of my beading photos, like for this post. She'd painted the walls a warm sage green that had lots of beige in it. It looked great with the counter-tops, the pale grey tile floors, and the white trim and porcelain. Normally I don't go for warm tones, but it looked great with my red poppies shower curtain and vanity set.

The only thing I (respectfully) disagreed with the previous owner about was the towel racks. You see, she liked brass, which is the one finish I absolutely can't stand. I'm more of a pewter/stainless steel person.

I took down the brass hooks on the back of the washroom door and replaced them with pewter ones fine, but there were a lot of towel racks to take down — a grand total of four. In addition, there were lots of clusters of pin-holes in the walls where thumbtacks had been used to hang up small pictures. I had to do a lot of spackling on both of the main walls. The only recourse was to repaint.

I spent a lot of time holding up paint chip cards to the walls, and settled on a colour. The local paint store, who had stood me so well back when I repainted my bedroom, let me down. They kept recommending light, very light colours for the bathroom. From a decorating point of view I understand, because it is a small room with no windows, but that vanity counter really needs something to pull it together with the rest of the room. I am not in a financial or aesthetic situation where I can think of replacing the vanity counter. Besides, I like it.

The quart of paint I bought looked like trouble as soon as I opened the lid, but the staff at the paint store had assured me that the colour would darken considerably as the paint dried.

They lied. The first wall I did is touch-dry now, and it's much lighter than what was on the paint chip, never mind the warm sage green I was going for. It's white. It looks like primer with a slight sage green tone. It makes the washroom look like it's the staff washroom in a sub-par retail outlet.

All right, all right, I know that colour is never guaranteed when you buy paint, but this isn't even close. It is several shades lighter than the original colour, which I knew I wasn't going to match perfectly, but wanted to get as close as possible to. Now I'm going to have to repaint entirely, possibly even use two coats to cover up the debacle currently gracing the walls.

The only good news is that the room takes less than the length of one CD (the Trainspotting soundtrack, if you really want to know) to paint, albeit with less than my usual care in the corners because I was annoyed when I was doing the work.

I would post photos, but photos don't tend to turn out well because of the aforementioned windowlessness. The flash distorts the wall colour a lot. I will, however, try for photos when I finally have my happy ending to this adventure and get the damn walls the colour I want!

Time of Reckoning by Katherine Hajer

I'm moving in about a month, and all I can think about is: where am I going to put my stash in the new place? It's an issue, because the new place is only about two-thirds the size of the old place (but with a washer/dryer and dishwasher, so very much worth it). This, of course, leads to the usual question of "How do I turn all this stash into useful stuff, like clothes and gifts?"

And that, dear reader, led to a very useful review of What's In the Stash.

Disclaimer: I started my DIY life with virtually no stash. My grandmother gave me just enough of her stash that if I wanted to try out a new stitch pattern (or, in the case of crochet, a whole new craft), I could do it, but not have much more of any given colour than was enough for a few inches of fabric. That was fine — it encouraged me to experiment without going for the grand plunge of a whole new project to work on.

Then I inherited my grandmother's stash, plus the stash of a friend of the family who gave up knitting due to her arthritis. I also started earning a reasonable income. The consequence is that I have a crazy amount of odd balls of yarn, mostly in acrylic, and absolutely no compunction to give them up. When I mention it, people always tell me to give it to charity. They don't get that I don't want to give it to charity. I will buy new yarn and give it to charity, no problem. But this is my inherited stash, and what I'm really interested in is in turning it into cool-looking clothing that doesn't look like I made it from stash.

Not everything is in odd balls. Some yarn I have enough of to make a solid-colour sweater. Other yarn I have enough of to be a main colour with contrast colours either gathered from the stash or bought new to supplement. I love Sally Melville's adage that, "It takes a little cash to use up a whole lot of stash!".

To that end, I'm currently crocheting a wool cardigan from Teva Durham's Loop-d-loop Crochet book (the one I'm making is the one with the Irish crochet medallions on the front). The main colour is stash; I bought the contrasting colours. It's all in Mission Falls wool, so it all goes together nicely. I'll post photos here when enough of it is done.

It's also a good time to recycle ideas I had for things that didn't work out in previous stash-reduction exercises. A couple of years ago I tried making a woven-look tailored jacket out of the Golden Hands/Creative Hands set I have from the early 1970s, and while the fabric looked great, it became rather obvious I was going to run out of yarn. Now I've discovered other yarn, in a different colour and in greater quantity, and I'm thinking it's time to resurrect that idea.

Plus, the opportunity to try the really "grand" projects that would be prohibitively expensive to buy as a single project, like those wonderful knee-length Kaffe Fassett coats. Sure, you're supposed to make them out of luxurious Rowan and other yarns, but even acrylic starts to look nice when you combine enough colours.

As scary as the yarn packing is going to be, this could be a lot of fun. If only I had time to both knit and pack....